GetNotes Tools
line/line-bot-mcp-server
Tool นี้คืออะไร
LINE Bot MCP Server เป็นการนำ Model Context Protocol (MCP) server มาใช้เพื่อเชื่อมต่อ LINE Messaging API เข้ากับ AI Agent ช่วยให้นักพัฒนาสามารถสร้าง AI Agent ที่โต้ตอบกับผู้ใช้ LINE ผ่าน LINE Official Account ได้อย่างง่ายดาย
ข้อมูลโปรเจกต์
ดาว
703
Forks
131
License
Apache-2.0
อัปเดต GitHub ล่าสุด
23 ก.ค. 2569
เพิ่มใน GetNotes
30 ก.ค. 2569
Repository
line/line-bot-mcp-server
รูปแบบ
เหมาะกับงาน
เหมาะกับอาชีพ
Ecosystem
TypeScript
แปลและเรียบเรียงโดย AI
เนื้อหาฉบับภาษาไทย
ใช้อ่านเพื่อทำความเข้าใจเบื้องต้น โปรดตรวจสอบรายละเอียดสำคัญกับเอกสารต้นฉบับด้านล่าง
LINE Bot MCP Server

การนำ Model Context Protocol (MCP) server มาใช้ ซึ่งรวม LINE Messaging API เพื่อเชื่อมต่อ AI Agent เข้ากับ LINE Official Account
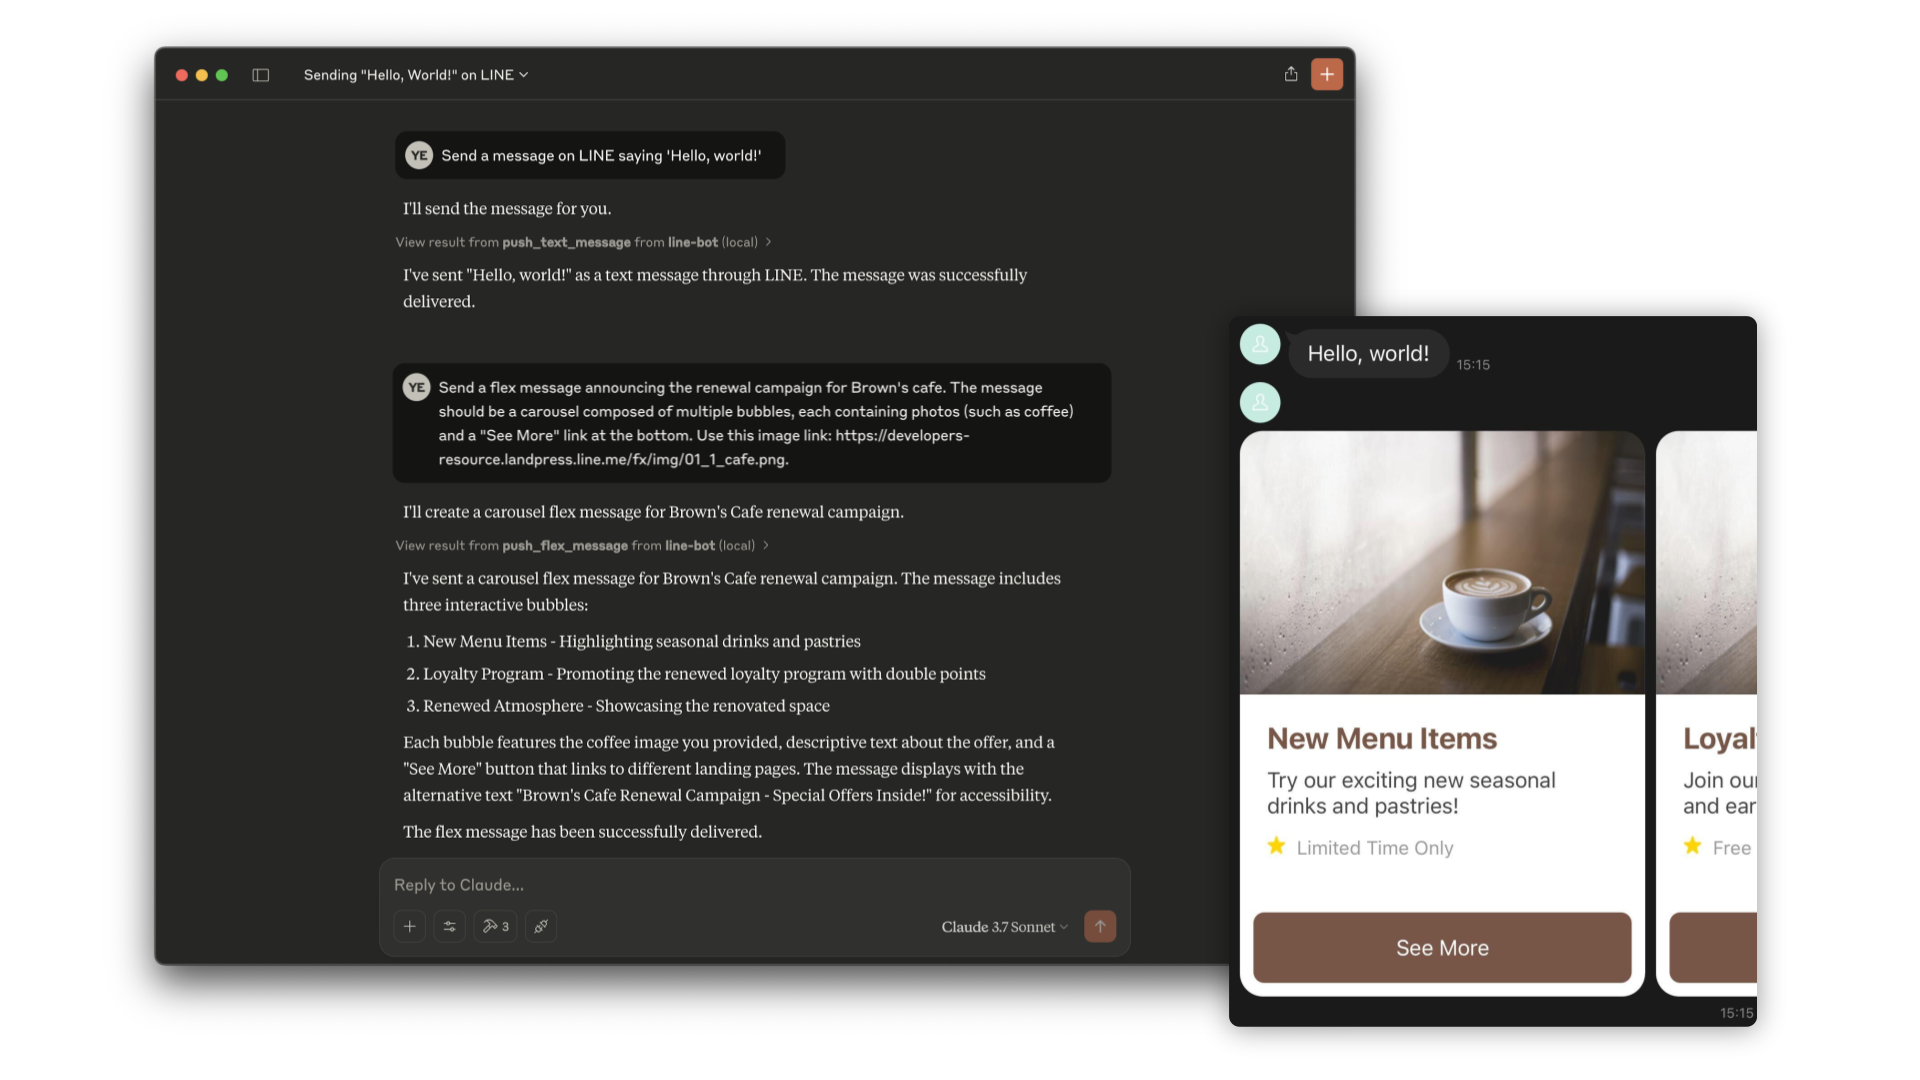
ที่เก็บนี้จัดทำขึ้นในเวอร์ชันพรีวิว แม้ว่าเราจะนำเสนอเพื่อวัตถุประสงค์ในการทดลอง โปรดทราบว่าอาจยังไม่มีฟังก์ชันการทำงานที่สมบูรณ์หรือการสนับสนุนที่ครอบคลุม
เครื่องมือ
- 1**push_text_message*** ส่งข้อความตัวอักษรธรรมดาไปยังผู้ใช้ผ่าน LINE * **Inputs:** * `userId` (string?): ID ผู้ใช้ที่จะรับข้อความ ค่าเริ่มต้นคือ DESTINATION_USER_ID จะต้องตั้งค่า `userId` หรือ `DESTINATION_USER_ID` อย่างใดอย่างหนึ่ง * `message.text` (string): เนื้อหาข้อความตัวอักษรธรรมดาที่จะส่งถึงผู้ใช้
- 2**push_flex_message*** ส่งข้อความ Flex ที่ปรับแต่งได้สูงไปยังผู้ใช้ผ่าน LINE * **Inputs:** * `userId` (string?): ID ผู้ใช้ที่จะรับข้อความ ค่าเริ่มต้นคือ DESTINATION_USER_ID จะต้องตั้งค่า `userId` หรือ `DESTINATION_USER_ID` อย่างใดอย่างหนึ่ง * `message.altText` (string): ข้อความสำรองที่แสดงเมื่อไม่สามารถแสดงข้อความ Flex ได้ * `message.contents` (any): เนื้อหาของข้อความ Flex นี่คือออบเจกต์ JSON ที่กำหนดเค้าโครงและส่วนประกอบของข้อความ * `message.contents.type` (enum): ประเภทของคอนเทนเนอร์ 'bubble' สำหรับคอนเทนเนอร์เดี่ยว, 'carousel' สำหรับหลาย bubble ที่สามารถปัดได้
- 3**broadcast_text_message*** ส่งข้อความตัวอักษรธรรมดาผ่าน LINE ไปยังผู้ใช้ทุกคนที่ติดตาม LINE Official Account ของคุณ * **Inputs:** * `message.text` (string): เนื้อหาข้อความตัวอักษรธรรมดาที่จะส่งถึงผู้ใช้
- 4**broadcast_flex_message*** ส่งข้อความ Flex ที่ปรับแต่งได้สูงผ่าน LINE ไปยังผู้ใช้ทุกคนที่เพิ่ม LINE Official Account ของคุณ * **Inputs:** * `message.altText` (string): ข้อความสำรองที่แสดงเมื่อไม่สามารถแสดงข้อความ Flex ได้ * `message.contents` (any): เนื้อหาของข้อความ Flex นี่คือออบเจกต์ JSON ที่กำหนดเค้าโครงและส่วนประกอบของข้อความ * `message.contents.type` (enum): ประเภทของคอนเทนเนอร์ 'bubble' สำหรับคอนเทนเนอร์เดี่ยว, 'carousel' สำหรับหลาย bubble ที่สามารถปัดได้
- 5**get_profile*** รับข้อมูลโปรไฟล์โดยละเอียดของผู้ใช้ LINE รวมถึงชื่อที่แสดง, URL รูปโปรไฟล์, ข้อความสถานะ และภาษา * **Inputs:** * `userId` (string?): ID ของผู้ใช้ที่คุณต้องการดึงโปรไฟล์ ค่าเริ่มต้นคือ DESTINATION_USER_ID
- 6**get_message_quota*** รับโควตาข้อความและการใช้งานของ LINE Official Account ซึ่งแสดงขีดจำกัดข้อความรายเดือนและการใช้งานปัจจุบัน * **Inputs:** * None
- 7**get_rich_menu_list*** รับรายการ Rich Menu ที่เชื่อมโยงกับ LINE Official Account ของคุณ * **Inputs:** * None
- 8**delete_rich_menu*** ลบ Rich Menu ออกจาก LINE Official Account ของคุณ * **Inputs:** * `richMenuId` (string): ID ของ Rich Menu ที่จะลบ
- 9**set_rich_menu_default*** ตั้งค่า Rich Menu เป็น Rich Menu เริ่มต้น * **Inputs:** * `richMenuId` (string): ID ของ Rich Menu ที่จะตั้งเป็นค่าเริ่มต้น
- 10**cancel_rich_menu_default*** ยกเลิก Rich Menu เริ่มต้น * **Inputs:** * None
- 11**create_rich_menu*** สร้าง Rich Menu ตามการกระทำที่กำหนด สร้างและอัปโหลดรูปภาพ ตั้งค่าเป็นค่าเริ่มต้น * **Inputs:** * `chatBarText` (string): ข้อความที่แสดงในแถบแชท ซึ่งใช้เป็นชื่อ Rich Menu ด้วย * `actions` (array): การกระทำของ Rich Menu คุณสามารถระบุการกระทำได้ขั้นต่ำ 1 ถึงสูงสุด 6 การกระทำ แต่ละการกระทำสามารถเป็นประเภทใดประเภทหนึ่งต่อไปนี้: * `postback`: สำหรับส่งการกระทำ postback * `message`: สำหรับส่งข้อความตัวอักษร * `uri`: สำหรับเปิด URL * `datetimepicker`: สำหรับเปิดตัวเลือกวันที่/เวลา * `camera`: สำหรับเปิดกล้อง * `cameraRoll`: สำหรับเปิดม้วนฟิล์มกล้อง * `location`: สำหรับส่งตำแหน่งปัจจุบัน * `richmenuswitch`: สำหรับสลับไปยัง Rich Menu อื่น * `clipboard`: สำหรับคัดลอกข้อความไปยังคลิปบอร์ด
- 12**get_follower_ids*** รับรายการ ID ผู้ใช้ของผู้ใช้ที่เพิ่ม LINE Official Account เป็นเพื่อน ซึ่งช่วยให้คุณสามารถรับ ID ผู้ใช้เพื่อส่งข้อความโดยไม่ต้องเตรียมด้วยตนเอง * **Inputs:** * `start` (string?): โทเค็นต่อเนื่องเพื่อรับอาร์เรย์ ID ผู้ใช้ถัดไป ส่งคืนในคุณสมบัติ `next` ของการตอบกลับก่อนหน้า * `limit` (number?): จำนวนสูงสุดของ ID ผู้ใช้ที่จะดึงข้อมูลในการร้องขอครั้งเดียว
การติดตั้ง (โดยใช้ npx)
ข้อกำหนด:
- Node.js v22 หรือใหม่กว่า
ขั้นตอนที่ 1: สร้าง LINE Official Account
MCP server นี้ใช้ LINE Official Account หากคุณยังไม่มี โปรดสร้างโดยทำตาม คำแนะนำนี้
หากคุณมี LINE Official Account อยู่แล้ว ให้เปิดใช้งาน Messaging API สำหรับ LINE Official Account ของคุณโดยทำตาม คำแนะนำนี้
ขั้นตอนที่ 2: กำหนดค่า AI Agent
โปรดเพิ่มการกำหนดค่าต่อไปนี้สำหรับ AI Agent เช่น Claude Desktop หรือ Cline
ตั้งค่าตัวแปรสภาพแวดล้อมหรืออาร์กิวเมนต์ดังนี้:
CHANNEL_ACCESS_TOKEN: (จำเป็น) Channel Access Token คุณสามารถยืนยันได้โดยทำตาม คำแนะนำนี้DESTINATION_USER_ID: (ไม่บังคับ) ID ผู้ใช้เริ่มต้นของผู้รับ หากอินพุตของ Tool ไม่มีuserIdจะต้องระบุDESTINATION_USER_IDคุณสามารถยืนยันได้โดยทำตาม คำแนะนำนี้
{
  "mcpServers": {
    "line-bot": {
      "command": "npx",
      "args": [
        "@line/line-bot-mcp-server"
      ],
      "env": {
        "NPM_CONFIG_IGNORE_SCRIPTS": "true",
        "CHANNEL_ACCESS_TOKEN" : "FILL_HERE",
        "DESTINATION_USER_ID" : "FILL_HERE"
      }
    }
  }
}
การติดตั้ง (โดยใช้ Docker)
ขั้นตอนที่ 1: สร้าง LINE Official Account
MCP server นี้ใช้ LINE Official Account หากคุณยังไม่มี โปรดสร้างโดยทำตาม คำแนะนำนี้
หากคุณมี LINE Official Account อยู่แล้ว ให้เปิดใช้งาน Messaging API สำหรับ LINE Official Account ของคุณโดยทำตาม คำแนะนำนี้
ขั้นตอนที่ 2: สร้างอิมเมจ line-bot-mcp-server
โคลนที่เก็บนี้:
git clone git@github.com:line/line-bot-mcp-server.gitสร้างอิมเมจ Docker:
docker build -t line/line-bot-mcp-server .ขั้นตอนที่ 3: กำหนดค่า AI Agent
โปรดเพิ่มการกำหนดค่าต่อไปนี้สำหรับ AI Agent เช่น Claude Desktop หรือ Cline
ตั้งค่าตัวแปรสภาพแวดล้อมหรืออาร์กิวเมนต์ดังนี้:
mcpServers.args: (จำเป็น) พาธไปยังline-bot-mcp-serverCHANNEL_ACCESS_TOKEN: (จำเป็น) Channel Access Token คุณสามารถยืนยันได้โดยทำตาม คำแนะนำนี้DESTINATION_USER_ID: (ไม่บังคับ) ID ผู้ใช้เริ่มต้นของผู้รับ หากอินพุตของ Tool ไม่มีuserIdจะต้องระบุDESTINATION_USER_IDคุณสามารถยืนยันได้โดยทำตาม คำแนะนำนี้
{
  "mcpServers": {
    "line-bot": {
      "command": "docker",
      "args": [
        "run",
        "-i",
        "--rm",
        "-e",
        "CHANNEL_ACCESS_TOKEN",
        "-e",
        "DESTINATION_USER_ID",
        "line/line-bot-mcp-server"
      ],
      "env": {
        "CHANNEL_ACCESS_TOKEN" : "FILL_HERE",
        "DESTINATION_USER_ID" : "FILL_HERE"
      }
    }
  }
}
การพัฒนาในเครื่องด้วย Inspector
คุณสามารถใช้ MCP Inspector เพื่อทดสอบและดีบักเซิร์ฟเวอร์ในเครื่องได้
ข้อกำหนดเบื้องต้น
- 1โคลนที่เก็บ: git clone git@github.com:line/line-bot-mcp-server.git cd line-bot-mcp-server
- 2ติดตั้ง dependencies: npm install
- 3สร้างโปรเจกต์: npm run build
เรียกใช้ Inspector
หลังจากสร้างโปรเจกต์แล้ว คุณสามารถเริ่ม MCP Inspector ได้:
npx @modelcontextprotocol/inspector node dist/index.js \
  -e CHANNEL_ACCESS_TOKEN="YOUR_CHANNEL_ACCESS_TOKEN" \
  -e DESTINATION_USER_ID="YOUR_DESTINATION_USER_ID"
สิ่งนี้จะเริ่มอินเทอร์เฟซ MCP Inspector ซึ่งคุณสามารถโต้ตอบกับเครื่องมือ LINE Bot MCP Server และทดสอบฟังก์ชันการทำงานของมันได้
การกำหนดเวอร์ชัน
โปรเจกต์นี้ใช้การกำหนดเวอร์ชันเชิงความหมาย (semantic versioning)
การมีส่วนร่วม
โปรดตรวจสอบ CONTRIBUTING ก่อนที่จะมีส่วนร่วม
เอกสารโปรเจกต์
อ่านเอกสารต้นฉบับ
README วิธีติดตั้ง วิธีใช้งาน และข้อกำหนดจาก repository ต้นฉบับ
LINE Bot MCP Server
Model Context Protocol (MCP) server implementation that integrates the LINE Messaging API to connect an AI Agent to the LINE Official Account.
This repository is provided as a preview version. While we offer it for experimental purposes, please be aware that it may not include complete functionality or comprehensive support.
Tools
- 1**push_text_message**- Push a simple text message to a user via LINE. - **Inputs:** - `userId` (string?): The user ID to receive a message. Defaults to DESTINATION_USER_ID. Either `userId` or `DESTINATION_USER_ID` must be set. - `message.text` (string): The plain text content to send to the user.
- 2**push_flex_message**- Push a highly customizable flex message to a user via LINE. - **Inputs:** - `userId` (string?): The user ID to receive a message. Defaults to DESTINATION_USER_ID. Either `userId` or `DESTINATION_USER_ID` must be set. - `message.altText` (string): Alternative text shown when flex message cannot be displayed. - `message.contents` (any): The contents of the flex message. This is a JSON object that defines the layout and components of the message. - `message.contents.type` (enum): Type of the container. 'bubble' for single container, 'carousel' for multiple swipeable bubbles.
- 3**broadcast_text_message**- Broadcast a simple text message via LINE to all users who have followed your LINE Official Account. - **Inputs:** - `message.text` (string): The plain text content to send to the users.
- 4**broadcast_flex_message**- Broadcast a highly customizable flex message via LINE to all users who have added your LINE Official Account. - **Inputs:** - `message.altText` (string): Alternative text shown when flex message cannot be displayed. - `message.contents` (any): The contents of the flex message. This is a JSON object that defines the layout and components of the message. - `message.contents.type` (enum): Type of the container. 'bubble' for single container, 'carousel' for multiple swipeable bubbles.
- 5**get_profile**- Get detailed profile information of a LINE user including display name, profile picture URL, status message and language. - **Inputs:** - `userId` (string?): The ID of the user whose profile you want to retrieve. Defaults to DESTINATION_USER_ID.
- 6**get_message_quota**- Get the message quota and consumption of the LINE Official Account. This shows the monthly message limit and current usage. - **Inputs:** - None
- 7**get_rich_menu_list**- Get the list of rich menus associated with your LINE Official Account. - **Inputs:** - None
- 8**delete_rich_menu**- Delete a rich menu from your LINE Official Account. - **Inputs:** - `richMenuId` (string): The ID of the rich menu to delete.
- 9**set_rich_menu_default** - Set a rich menu as the default rich menu. - **Inputs:** - `richMenuId` (string): The ID of the rich menu to set as default.
- 10**cancel_rich_menu_default**- Cancel the default rich menu. - **Inputs:** - None
- 11**create_rich_menu**- Create a rich menu based on the given actions. Generate and upload an image. Set as default. - **Inputs:** - `chatBarText` (string): Text displayed in chat bar, also used as rich menu name. - `actions` (array): The actions of the rich menu. You can specify minimum 1 to maximum 6 actions. Each action can be one of the following types: - `postback`: For sending a postback action - `message`: For sending a text message - `uri`: For opening a URL - `datetimepicker`: For opening a date/time picker - `camera`: For opening the camera - `cameraRoll`: For opening the camera roll - `location`: For sending the current location - `richmenuswitch`: For switching to another rich menu - `clipboard`: For copying text to clipboard
- 12**get_follower_ids**- Get a list of user IDs of users who have added the LINE Official Account as a friend. This allows you to obtain user IDs for sending messages without manually preparing them. - **Inputs:** - `start` (string?): Continuation token to get the next array of user IDs. Returned in the `next` property of a previous response. - `limit` (number?): The maximum number of user IDs to retrieve in a single request.
- 13**get_group_summary**- Get the group chat summary including group ID, group name, and group icon URL, using the group ID. - **Inputs:** - `groupId` (string): The group ID of the target group chat.
Installation (Using npx)
requirements:
- Node.js v22 or later
Step 1: Create LINE Official Account
This MCP server utilizes a LINE Official Account. If you do not have one, please create it by following this instructions.
If you have a LINE Official Account, enable the Messaging API for your LINE Official Account by following this instructions.
Step 2: Configure AI Agent
Please add the following configuration for an AI Agent like Claude Desktop or Cline.
Set the environment variables or arguments as follows:
CHANNEL_ACCESS_TOKEN: (required) Channel Access Token. You can confirm this by following this instructions.DESTINATION_USER_ID: (optional) The default user ID of the recipient. If the Tool's input does not includeuserId,DESTINATION_USER_IDis required. You can confirm this by following this instructions.
{
  "mcpServers": {
    "line-bot": {
      "command": "npx",
      "args": [
        "@line/line-bot-mcp-server"
      ],
      "env": {
        "NPM_CONFIG_IGNORE_SCRIPTS": "true",
        "CHANNEL_ACCESS_TOKEN" : "FILL_HERE",
        "DESTINATION_USER_ID" : "FILL_HERE"
      }
    }
  }
}
Installation (Using Docker)
Step 1: Create LINE Official Account
This MCP server utilizes a LINE Official Account. If you do not have one, please create it by following this instructions.
If you have a LINE Official Account, enable the Messaging API for your LINE Official Account by following this instructions.
Step 2: Build line-bot-mcp-server image
Clone this repository:
git clone git@github.com:line/line-bot-mcp-server.gitBuild the Docker image:
docker build -t line/line-bot-mcp-server .Step 3: Configure AI Agent
Please add the following configuration for an AI Agent like Claude Desktop or Cline.
Set the environment variables or arguments as follows:
mcpServers.args: (required) The path toline-bot-mcp-server.CHANNEL_ACCESS_TOKEN: (required) Channel Access Token. You can confirm this by following this instructions.DESTINATION_USER_ID: (optional) The default user ID of the recipient. If the Tool's input does not includeuserId,DESTINATION_USER_IDis required. You can confirm this by following this instructions.
{
  "mcpServers": {
    "line-bot": {
      "command": "docker",
      "args": [
        "run",
        "-i",
        "--rm",
        "-e",
        "CHANNEL_ACCESS_TOKEN",
        "-e",
        "DESTINATION_USER_ID",
        "line/line-bot-mcp-server"
      ],
      "env": {
        "CHANNEL_ACCESS_TOKEN" : "FILL_HERE",
        "DESTINATION_USER_ID" : "FILL_HERE"
      }
    }
  }
}
Local Development with Inspector
You can use the MCP Inspector to test and debug the server locally.
Prerequisites
- 1Clone the repository:
git clone git@github.com:line/line-bot-mcp-server.git
cd line-bot-mcp-server- 1Install dependencies:
npm install- 1Build the project:
npm run buildRun the Inspector
After building the project, you can start the MCP Inspector:
npx @modelcontextprotocol/inspector node dist/index.js \
  -e CHANNEL_ACCESS_TOKEN="YOUR_CHANNEL_ACCESS_TOKEN" \
  -e DESTINATION_USER_ID="YOUR_DESTINATION_USER_ID"
This will start the MCP Inspector interface where you can interact with the LINE Bot MCP Server tools and test their functionality.
Versioning
This project respects semantic versioning
Contributing
Please check CONTRIBUTING before making a contribution.