
GetNotes Tools
Graphify-Labs/graphify
Tool นี้คืออะไร
Graphify เป็นเครื่องมือสำหรับนักพัฒนาที่ช่วยแปลงโปรเจกต์ (โค้ด, เอกสาร, PDF, รูปภาพ, วิดีโอ) ให้เป็น Knowledge Graph ที่สามารถสอบถามได้แทนการค้นหาไฟล์ เหมาะสำหรับผู้ที่ต้องการทำความเข้าใจโครงสร้างโปรเจกต์อย่างลึกซึ้งและค้นหาข้อมูลได้อย่างมีประสิทธิภาพ
ข้อมูลโปรเจกต์
ดาว
117K
Forks
11.3K
License
Apache-2.0
อัปเดต GitHub ล่าสุด
10 ก.ย. 2569
เพิ่มใน GetNotes
17 ก.ค. 2569
Repository
Graphify-Labs/graphify
รูปแบบ
เหมาะกับงาน
เหมาะกับอาชีพ
Ecosystem
Python
แปลและเรียบเรียงโดย AI
เนื้อหาฉบับภาษาไทย
ใช้อ่านเพื่อทำความเข้าใจเบื้องต้น โปรดตรวจสอบรายละเอียดสำคัญกับเอกสารต้นฉบับด้านล่าง
🇺🇸 English | 🇨🇳 简体中文 | 🇯🇵 日本語 | 🇰🇷 한국어 | 🇩🇪 Deutsch | 🇫🇷 Français | 🇪🇸 Español | 🇮🇳 हिन्दी | 🇧🇷 Português | 🇷🇺 Русский | 🇸🇦 العربية | 🇮🇷 فارسی | 🇮🇹 Italiano | 🇵🇱 Polski | 🇳🇱 Nederlands | 🇹🇷 Türkçe | 🇺🇦 Українська | 🇻🇳 Tiếng Việt | 🇮🇩 Bahasa Indonesia | 🇸🇪 Svenska | 🇬🇷 Ελληνικά | 🇷🇴 Română | 🇨🇿 Čeština | 🇫🇮 Suomi | 🇩🇰 Dansk | 🇳🇴 Norsk | 🇭🇺 Magyar | 🇹🇭 ภาษาไทย | 🇺🇿 Oʻzbekcha | 🇹🇼 繁體中文 | 🇵🇭 Filipino | 🇮🇱 עברית




พิมพ์ /graphify ใน AI coding assistant ของคุณ แล้วมันจะแมปโปรเจกต์ทั้งหมดของคุณ (โค้ด, เอกสาร, PDF, รูปภาพ, วิดีโอ) ให้เป็น knowledge graph ที่คุณสามารถ สอบถามได้แทนการค้นหา (grepping) ผ่านไฟล์
- แผนที่โค้ดฟรี, ทำงานแบบ local ทั้งหมด โค้ดถูกแยกวิเคราะห์ด้วย tree-sitter AST: กำหนดได้, ไม่มี LLM, ไม่มีอะไรออกจากเครื่องของคุณ (เอกสาร, PDF, รูปภาพ และวิดีโอใช้โมเดลของ assistant ของคุณ หรือ API key ที่กำหนดค่าไว้ สำหรับการประมวลผลเชิงความหมาย)
- ทุก edge มีคำอธิบาย การเชื่อมต่อแต่ละรายการจะถูกแท็ก
EXTRACTED(ชัดเจนในแหล่งที่มา) หรือINFERRED(แก้ไขโดย graphify) เพื่อให้คุณสามารถบอกได้ว่าอะไรถูกอ่านโดยตรงจากอะไรที่ถูกอนุมาน - ไม่ใช่ vector index ไม่มี embeddings, ไม่มี vector store: เป็นกราฟจริงที่คุณสามารถสำรวจได้ ถามคำถาม, ติดตามเส้นทางระหว่างสองสิ่ง, หรืออธิบายแนวคิดหนึ่ง
เริ่มต้นใช้งาน (30 วินาที):
uv tool install graphifyy      # ติดตั้ง CLI (หรือ: pipx install graphifyy)
graphify install               # ลงทะเบียน skill กับ AI assistant ของคุณ
จากนั้น ใน AI assistant ของคุณ:
/graphify .แค่นั้นเอง คุณจะได้ สามไฟล์:
graphify-out/
├── graph.html       เปิดในเบราว์เซอร์ใดก็ได้ — คลิกโหนด, กรอง, ค้นหา
├── GRAPH_REPORT.md  ไฮไลท์: แนวคิดหลัก, การเชื่อมต่อที่น่าประหลาดใจ, คำถามที่แนะนำ
└── graph.json       กราฟฉบับเต็ม — สอบถามได้ตลอดเวลาโดยไม่ต้องอ่านไฟล์ซ้ำ
ใช้งานได้ใน Claude Code, Cursor, Codex, Gemini CLI, GitHub Copilot และอีก 15+ รายการ — เลือกแพลตฟอร์มของคุณ
ดูการทำงานจริง
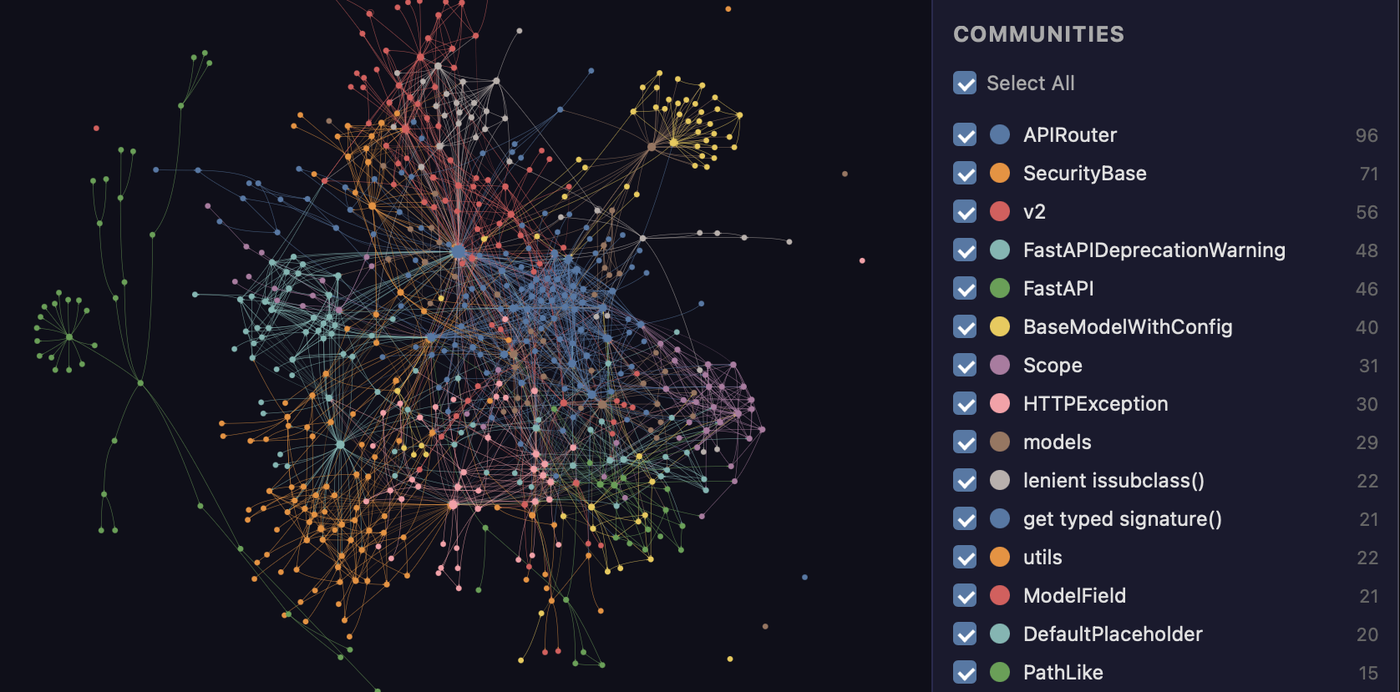
เมื่อสร้างกราฟเสร็จแล้ว คุณสามารถสอบถามได้แทนการอ่านไฟล์ นี่คือผลลัพธ์จริงที่ graphify รันบนโค้ดเบส FastAPI ที่แสดงด้านบน:
$ graphify explain "APIRouter"
Node: APIRouter
  Source:    routing.py L2210
  Community: 2
  Degree:    47

Connections (47):
  --> RequestValidationError [uses] [INFERRED]
  --> Dependant [uses] [INFERRED]
  --> .get() [method] [EXTRACTED]
  <-- __init__.py [imports] [EXTRACTED]
  ...

$ graphify path "FastAPI" "ModelField"
Shortest path (3 hops):
  FastAPI --uses--> DefaultPlaceholder <--references-- get_request_handler() --references--> ModelField
ทุก edge มี แท็กความน่าเชื่อถือ (EXTRACTED = ชัดเจนในแหล่งที่มา, INFERRED = ได้มาจากการแก้ไข) เพื่อให้คุณสามารถบอกได้ว่าอะไรถูกอ่านโดยตรงจากอะไรที่ถูกอนุมาน graphify query "<question>" จะส่งคืน subgraph ที่กำหนดขอบเขตสำหรับคำถามภาษาธรรมดา และ graphify path A B จะติดตามว่าสองสิ่งเชื่อมต่อกันอย่างไร
สิ่งที่ทำได้
สิ่งที่คุณจะได้รับทันที:
| ความสามารถ | สิ่งที่คุณจะได้รับ |
|---|---|
| God nodes | แนวคิดที่มีการเชื่อมต่อมากที่สุด เพื่อให้คุณเห็นว่าทุกสิ่งไหลผ่านอะไร |
| Communities | กราฟที่แบ่งออกเป็นระบบย่อย (Leiden) พร้อมป้ายกำกับที่ไม่มี LLM |
| Cross-file links | calls / imports / inherits / mixes_in ที่แก้ไขข้ามภาษาประมาณ 40 ภาษาผ่าน tree-sitter AST |
| Query, path, explain | ถามคำถาม, ติดตามเส้นทางระหว่างสองสิ่ง, หรืออธิบายแนวคิดหนึ่ง ทั้งหมดนี้เทียบกับ graph.json |
| Rationale + doc refs | คอมเมนต์ # NOTE: / # WHY: และการอ้างอิง ADR/RFC กลายเป็นโหนดระดับเฟิร์สคลาสที่เชื่อมโยงกับโค้ด |
| นอกเหนือจากโค้ด | เอกสาร, PDF, รูปภาพ และวิดีโอ/เสียง ทั้งหมดถูกแมปเข้าสู่กราฟเดียวกัน |
| Local-first | โค้ดถูกแยกวิเคราะห์แบบ local ด้วย tree-sitter (ไม่มี LLM, ไม่มีอะไรออกจากเครื่องของคุณ); เฉพาะการประมวลผลเชิงความหมายของเอกสาร/สื่อเท่านั้นที่เรียกใช้แบ็กเอนด์ และเฉพาะเมื่อคุณกำหนดค่าไว้ |
เกณฑ์มาตรฐาน
| เกณฑ์มาตรฐาน | ตัวชี้วัด | graphify | Field |
|---|---|---|---|
| LOCOMO (n=300) | recall@10 | 0.497 | mem0 0.048, supermemory 0.149 |
| LOCOMO (n=300) | QA accuracy | 45.3% | supermemory 49.7%, mem0 27.3% |
| LongMemEval-S (n=50) | QA accuracy | 76% | เท่ากับ dense RAG |
| Graph build | LLM credits | 0 | ต่อโทเค็นสำหรับระบบส่วนใหญ่ |
ทุกระบบทำงานบนชุดทดสอบเดียวกันด้วยโมเดลและงบประมาณเดียวกัน โดยให้คะแนนโดยผู้ประเมินที่ได้รับการตรวจสอบแบบ blind-validated กับผู้ประเมินคนที่สอง (ความเห็นพ้อง 90.6%, Cohen's kappa 0.81) ตารางเต็มต่อระบบ, ผลลัพธ์ code-intelligence และคำสั่งสำหรับการทำซ้ำ: BENCHMARKS.md
ข้อกำหนดเบื้องต้น
| ข้อกำหนด | ขั้นต่ำ | ตรวจสอบ | ติดตั้ง |
|---|---|---|---|
| Python | 3.10+ | python --version | python.org |
| uv (แนะนำ) | ใดๆ | uv --version | curl -LsSf https://astral.sh/uv/install.sh | sh |
| pipx (ทางเลือก) | ใดๆ | pipx --version | pip install pipx |
การติดตั้งด่วนบน macOS (Homebrew):
brew install python@3.12 uvการติดตั้งด่วนบน Windows:
winget install astral-sh.uvUbuntu/Debian:
sudo apt install python3.12 python3-pip pipx
# หรือติดตั้ง uv:
curl -LsSf https://astral.sh/uv/install.sh | sh
การติดตั้ง
แพ็กเกจอย่างเป็นทางการ: แพ็กเกจ PyPI คือ graphifyy (มี y สองตัว) แพ็กเกจ graphify* อื่นๆ บน PyPI ไม่เกี่ยวข้อง
ขั้นตอนที่ 1 — ติดตั้งแพ็กเกจ:
# แนะนำ (สภาพแวดล้อมแยก; หากไม่พบ 'graphify' หลังจากนั้น ให้รัน: uv tool update-shell):
uv tool install graphifyy

# ทางเลือก:
pipx install graphifyy
pip install graphifyy  # อาจต้องตั้งค่า PATH — ดูหมายเหตุด้านล่าง

**ขั้นตอนที่ 2 — ลงทะเบียน skill กับผู้ช่วย AI ของคุณ:**

```bash
graphify install
แค่นั้นเอง เปิดผู้ช่วย AI ของคุณแล้วพิมพ์ /graphify .
หากต้องการติดตั้ง skill ของผู้ช่วยลงใน repository ปัจจุบัน แทนที่จะเป็นโปรไฟล์ผู้ใช้ของคุณ ให้เพิ่ม --project:
graphify install --project
graphify install --project --platform codex
การติดตั้งแบบ project-scoped จะเขียนไฟล์ลงในไดเรกทอรีปัจจุบัน เช่น .claude/skills/graphify/SKILL.md หรือ .agents/skills/graphify/SKILL.md (พร้อมกับไฟล์ references/ ที่ skill จะโหลดเมื่อจำเป็น) และแสดงคำแนะนำ git add สำหรับไฟล์ที่สามารถคอมมิตได้
คำสั่งเฉพาะแพลตฟอร์มที่รองรับการติดตั้งแบบ project-scoped ยอมรับแฟล็กเดียวกัน เช่น graphify claude install --project หรือ graphify codex install --project
หมายเหตุสำหรับ PowerShell: ใช้ graphify . ไม่ใช่ /graphify . — เครื่องหมายสแลชนำหน้าเป็นตัวคั่นพาธใน PowerShell
graphify: command not found? uv tool install / pipx install จะวางคำสั่ง graphify ไว้ในไดเรกทอรี bin ของเครื่องมือ (~/.local/bin) หากเชลล์ของคุณหาไม่พบหลังจากติดตั้งทันที — ซึ่งมักเกิดขึ้นในการตั้งค่า macOS + zsh ใหม่ — แสดงว่าไดเรกทอรีนั้นยังไม่ได้อยู่ใน PATH ของคุณ: ให้รัน uv tool update-shell (หรือ pipx ensurepath) จากนั้นเปิดเทอร์มินัลใหม่ หากใช้ pip ปกติ ให้เพิ่ม ~/.local/bin (Linux) หรือ ~/Library/Python/3.x/bin (Mac) ลงใน PATH ของคุณ หรือรัน python -m graphify
กำลังรันด้วย uvx / uv tool run แทนการติดตั้งใช่หรือไม่? ระบุชื่อแพ็กเกจ ไม่ใช่ชื่อคำสั่ง: uvx --from graphifyy graphify install uvx graphify … แบบธรรมดาจะล้มเหลว (No solution found … no versions of graphify) เนื่องจาก uv tool run อ่านคำแรกเป็น แพ็กเกจ และแพ็กเกจคือ graphifyy — คำสั่ง graphify อยู่ภายในนั้น
หลีกเลี่ยง pip install บน Mac/Windows หากเป็นไปได้ skill จะระบุ Python ณ รันไทม์จาก graphify-out/.graphify_python หากสิ่งนั้นชี้ไปยังสภาพแวดล้อมที่แตกต่างจากที่ pip ติดตั้งแพ็กเกจ คุณจะได้รับข้อผิดพลาด ModuleNotFoundError: No module named 'graphify' uv tool install และ pipx install จะแยกแพ็กเกจในสภาพแวดล้อมของตัวเองและหลีกเลี่ยงปัญหานี้ได้อย่างสมบูรณ์
Git hooks และ uv tool / pipx: graphify hook install จะฝังพาธของ interpreter ปัจจุบันลงในสคริปต์ hook โดยตรงในขณะติดตั้ง เพื่อให้ post-commit hook ทำงานได้อย่างถูกต้องแม้ในไคลเอนต์ Git แบบ GUI และ CI runner ที่ ~/.local/bin ไม่ได้อยู่ใน PATH หากคุณติดตั้งใหม่หรืออัปเกรด graphify ให้รัน graphify hook install อีกครั้งเพื่อรีเฟรชพาธที่ฝังไว้
| แพลตฟอร์ม | คำสั่งติดตั้ง |
|---|---|
| Claude Code (Linux/Mac) | graphify install |
| Claude Code (Windows) | graphify install (ตรวจจับอัตโนมัติ) หรือ graphify install --platform windows |
| CodeBuddy | graphify install --platform codebuddy |
| Codex | graphify install --platform codex |
| OpenCode | graphify install --platform opencode |
| Kilo Code | graphify install --platform kilo |
| GitHub Copilot CLI | graphify install --platform copilot |
| VS Code Copilot Chat | graphify vscode install |
| Aider | graphify install --platform aider |
| OpenClaw | graphify install --platform claw |
| Factory Droid | graphify install --platform droid |
| Trae | graphify install --platform trae |
| Trae CN | graphify install --platform trae-cn |
| Gemini CLI | graphify install --platform gemini |
| Hermes | graphify install --platform hermes |
| Kimi Code | graphify install --platform kimi |
| Amp | graphify amp install |
| Agent Skills (cross-framework) | graphify install --platform agents (ชื่อเรียกอีกอย่าง --platform skills) |
| Kiro IDE/CLI | graphify kiro install |
| Pi coding agent | graphify install --platform pi |
| Cursor | graphify cursor install |
| Devin CLI | graphify devin install |
| Google Antigravity | graphify antigravity install |
ผู้ใช้ Codex ยังต้องตั้งค่า multi_agent = true ภายใต้ [features] ใน ~/.codex/config.toml สำหรับการแยกข้อมูลแบบขนาน CodeBuddy ใช้เครื่องมือ Agent และกลไก PreToolUse hook เดียวกันกับ Claude Code Factory Droid ใช้เครื่องมือ Task สำหรับการส่งงาน subagent แบบขนาน OpenClaw และ Aider ใช้การแยกข้อมูลแบบลำดับ (การรองรับ agent แบบขนานยังอยู่ในช่วงเริ่มต้นสำหรับแพลตฟอร์มเหล่านี้) Trae ใช้เครื่องมือ Agent สำหรับการส่งงาน subagent แบบขนานและ ไม่ รองรับ PreToolUse hooks ดังนั้น AGENTS.md จึงเป็นกลไกที่ทำงานตลอดเวลา
--platform agents (หรือชื่อเรียกอีกอย่างว่า --platform skills) กำหนดเป้าหมายไปยังตำแหน่งของ Agent-Skills แบบ cross-framework ทั่วไป: คือ ~/.agents/skills/ ที่เป็น user-global ตามข้อกำหนด (อ่านโดย npx skills และเฟรมเวิร์กที่สอดคล้องกับข้อกำหนด) สำหรับการติดตั้งแบบ global และ ./.agents/skills/ สำหรับการติดตั้งแบบ project (--project) คำสั่ง graphify install แบบไม่มีแฟล็กจะยังคงเป็นแพลตฟอร์มเดียว (Claude Code) โดยการออกแบบ — ใช้แพลตฟอร์ม agents ที่ระบุชื่อเมื่อคุณต้องการให้ skill สามารถค้นพบได้โดยเฟรมเวิร์กใดๆ ที่อ่าน .agents/skills
Codex ใช้ $graphify แทน /graphify
| ส่วนเสริม | สิ่งที่เพิ่มเข้ามา | ติดตั้ง |
|---|---|---|
pdf | การแยกข้อมูล PDF | uv tool install "graphifyy[pdf]" |
office | รองรับ .docx และ .xlsx | uv tool install "graphifyy[office]" |
google | การเรนเดอร์ Google Sheets | uv tool install "graphifyy[google]" |
video | การถอดเสียงวิดีโอ/เสียง (faster-whisper + yt-dlp) | uv tool install "graphifyy[video]" |
mcp | MCP stdio server | uv tool install "graphifyy[mcp]" |
neo4j | รองรับการพุช Neo4j | uv tool install "graphifyy[neo4j]" |
falkordb | รองรับการพุช FalkorDB | uv tool install "graphifyy[falkordb]" |
svg | การส่งออกกราฟ SVG | uv tool install "graphifyy[svg]" |
leiden | การตรวจจับชุมชน Leiden (Python < 3.13 เท่านั้น) | uv tool install "graphifyy[leiden]" |
ollama | การอนุมานภายในเครื่องด้วย Ollama | uv tool install "graphifyy[ollama]" |
openai | OpenAI / API ที่เข้ากันได้กับ OpenAI | uv tool install "graphifyy[openai]" |
gemini | Google Gemini API | uv tool install "graphifyy[gemini]" |
anthropic | Anthropic Claude API (--backend claude, ใช้ ANTHROPIC_API_KEY) | uv tool install "graphifyy[anthropic]" |
bedrock | AWS Bedrock (ใช้ IAM, ไม่มี API key) | uv tool install "graphifyy[bedrock]" |
azure | Azure OpenAI Service (--backend azure, ใช้ AZURE_OPENAI_API_KEY + AZURE_OPENAI_ENDPOINT) | uv tool install "graphifyy[openai]" |
sql | การแยก Schema ของ SQL | uv tool install "graphifyy[sql]" |
postgres | การตรวจสอบ PostgreSQL แบบสด (--postgres DSN) | uv tool install "graphifyy[postgres]" |
dm | การแยก AST ของ BYOND DreamMaker .dm/.dme (อาจต้องใช้ C compiler + python3-dev หากไม่มี wheel ที่ตรงกับแพลตฟอร์มของคุณ) | uv tool install "graphifyy[dm]" |
terraform | การแยก AST ของ Terraform / HCL .tf/.tfvars/.hcl | uv tool install "graphifyy[terraform]" |
pascal | การแยก AST ของ Pascal / Delphi .pas/.dpr/.dpk/.inc (ให้ edge calls/inherits ที่แม่นยำยิ่งขึ้น; จะใช้ regex extractor แทนหากไม่มี) | uv tool install "graphifyy[pascal]" |
chinese | การแบ่งส่วนคำค้นหาภาษาจีน (jieba) | uv tool install "graphifyy[chinese]" |
all | ทั้งหมดข้างต้น | uv tool install "graphifyy[all]" |
ทำให้ผู้ช่วยของคุณใช้กราฟเสมอ
รันคำสั่งนี้เพียงครั้งเดียวในโปรเจกต์ของคุณหลังจากสร้างกราฟแล้ว:
| แพลตฟอร์ม | คำสั่ง |
|---|---|
| Claude Code | graphify claude install |
| CodeBuddy | graphify codebuddy install |
| Codex | graphify codex install |
| OpenCode | graphify opencode install |
| Kilo Code | graphify kilo install |
| GitHub Copilot CLI | graphify copilot install |
| VS Code Copilot Chat | graphify vscode install |
| Aider | graphify aider install |
| OpenClaw | graphify claw install |
| Factory Droid | graphify droid install |
| Trae | graphify trae install |
| Trae CN | graphify trae-cn install |
| Cursor | graphify cursor install |
| Gemini CLI | graphify gemini install |
| Hermes | graphify hermes install |
| Kimi Code | graphify install --platform kimi |
| Amp | graphify amp install |
| Agent Skills (cross-framework) | graphify agents install (ชื่อเรียกอีกอย่าง graphify skills install) |
| Kiro IDE/CLI | graphify kiro install |
| Pi coding agent | graphify pi install |
| Devin CLI | graphify devin install |
| Google Antigravity | graphify antigravity install |
สิ่งนี้จะเขียนไฟล์คอนฟิกขนาดเล็กที่บอกให้ผู้ช่วยของคุณปรึกษากราฟความรู้สำหรับคำถามเกี่ยวกับโค้ดเบส โดยจะเลือกใช้การค้นหาแบบ scoped เช่น graphify query "<question>" แทนที่จะอ่านรายงานฉบับเต็มหรือ grepping ไฟล์ดิบ
- แพลตฟอร์มที่ใช้ Hook (Claude Code, Gemini CLI): hook จะทำงานโดยอัตโนมัติก่อนการเรียกใช้เครื่องมือแบบค้นหา (และใน Claude Code จะทำงานก่อนการอ่านไฟล์ต้นฉบับทีละไฟล์ผ่านเครื่องมือ Read/Glob) และจะผลักดันให้ผู้ช่วยของคุณใช้เส้นทางกราฟ
- แพลตฟอร์มที่ใช้ไฟล์คำสั่ง (Codex, OpenCode, Cursor, เป็นต้น): ไฟล์คำสั่งแบบถาวร (
AGENTS.md,.cursor/rules/, เป็นต้น) จะให้คำแนะนำแบบ query-first เดียวกัน
GRAPH_REPORT.md ยังคงมีให้สำหรับการตรวจสอบสถาปัตยกรรมในวงกว้าง
CodeBuddy ทำสองสิ่งเหมือนกับ Claude Code: เขียนส่วน CODEBUDDY.md ที่บอกให้ CodeBuddy อ่าน graphify-out/GRAPH_REPORT.md ก่อนตอบคำถามเกี่ยวกับสถาปัตยกรรม และติดตั้งฮุก PreToolUse (.codebuddy/settings.json) ที่ทำงานก่อนคำสั่งค้นหา Bash และการอ่านไฟล์ โดยจะแนะนำให้ใช้ graphify query แทน
Codex เขียนไปยัง AGENTS.md และยังติดตั้งฮุก PreToolUse ใน .codex/hooks.json ที่ทำงานก่อนการเรียกใช้เครื่องมือ Bash ทุกครั้ง ซึ่งเป็นกลไกที่ทำงานตลอดเวลาเช่นเดียวกับ Claude Code
Kilo Code ติดตั้งทักษะ Graphify ไปยัง ~/.config/kilo/skills/graphify/SKILL.md และคำสั่ง /graphify แบบเนทีฟไปยัง ~/.config/kilo/command/graphify.md graphify kilo install ยังเขียน AGENTS.md และปลั๊กอิน tool.execute.before แบบเนทีฟ (.kilo/plugins/graphify.js + การลงทะเบียน .kilo/kilo.json หรือ .kilo/kilo.jsonc) เพื่อให้ Kilo ได้รับพฤติกรรมการเตือนกราฟที่ทำงานตลอดเวลาแบบเดียวกันผ่านการกำหนดค่า .kilo แบบเนทีฟ
Cursor เขียน .cursor/rules/graphify.mdc ด้วย alwaysApply: true ดังนั้น Cursor จะรวมไว้ในการสนทนาทุกครั้งโดยอัตโนมัติ ไม่ต้องใช้ฮุก
หากต้องการลบ graphify ออกจากทุกแพลตฟอร์มพร้อมกัน: graphify uninstall (เพิ่ม --purge เพื่อลบ graphify-out/ ด้วย) หรือใช้คำสั่งต่อแพลตฟอร์ม (เช่น graphify claude uninstall)
มีอะไรอยู่ในรายงาน
- God nodes — แนวคิดที่เชื่อมโยงกันมากที่สุดในโปรเจกต์ของคุณ ทุกอย่างไหลผ่านสิ่งเหล่านี้
- Surprising connections — ลิงก์ระหว่างสิ่งต่างๆ ที่อยู่ในไฟล์หรือโมดูลที่แตกต่างกัน จัดอันดับตามความไม่คาดคิด
- The "why" — คอมเมนต์ในบรรทัด (
# NOTE:,# WHY:,# HACK:), docstrings และเหตุผลในการออกแบบจากเอกสารจะถูกแยกออกมาเป็นโหนดแยกต่างหากที่เชื่อมโยงกับโค้ดที่อธิบาย - Suggested questions — คำถาม 4–5 ข้อที่กราฟสามารถตอบได้โดยเฉพาะ
- Confidence tags — ความสัมพันธ์ที่อนุมานได้ทุกรายการจะถูกทำเครื่องหมาย
EXTRACTED,INFERREDหรือAMBIGUOUSคุณจะรู้เสมอว่าอะไรถูกพบเทียบกับอะไรที่ถูกคาดเดา
ไฟล์ที่รองรับ
| ประเภท | นามสกุล |
|---|
| แฟล็ก | ค่าเริ่มต้น | วัตถุประสงค์ |
|---|---|---|
--transport {stdio,http} | stdio | ช่องทางการสื่อสารที่จะให้บริการ |
--host | 127.0.0.1 | โฮสต์สำหรับผูก HTTP (ใช้ 0.0.0.0 เพื่อเปิดเผยนอก localhost) |
--port | 8080 | พอร์ตสำหรับผูก HTTP |
--api-key | env GRAPHIFY_API_KEY | กำหนดให้มี Authorization: Bearer <key> (หรือ X-API-Key) |
--path | /mcp | พาธสำหรับเมานต์ HTTP |
--json-response | off | ส่งคืน JSON ธรรมดาแทนสตรีม SSE |
--stateless | off | ไม่มีสถานะต่อเซสชัน (สำหรับการปรับใช้แบบโหลดบาลานซ์ / CI) |
--session-timeout | 3600 | ลบเซสชันที่มีสถานะที่ไม่ได้ใช้งานหลังจาก N วินาที (0 ปิดใช้งาน) |
การผูก 127.0.0.1 โดยค่าเริ่มต้นเป็นแบบ loopback-only ตั้งค่า --host 0.0.0.0 และ --api-key พร้อมกันเมื่อเปิดเผยบนโฮสต์ที่ใช้ร่วมกัน รันในคอนเทนเนอร์:
docker build -t graphify .
docker run -p 8080:8080 -v "$(pwd)/graphify-out:/data" graphify \
  /data/graph.json --transport http --host 0.0.0.0 --api-key "$SECRET"
หมายเหตุสำหรับ WSL / Linux: Ubuntu มาพร้อมกับ python3 ไม่ใช่ python ใช้ venv เพื่อหลีกเลี่ยงความขัดแย้ง:
python3 -m venv .venv && .venv/bin/pip install "graphifyy[mcp]"ตัวแปรสภาพแวดล้อม
สิ่งเหล่านี้จำเป็นสำหรับ การดึงข้อมูลแบบ headless / CI (graphify extract) เท่านั้น เมื่อรันผ่านสกิล /graphify ภายใน IDE ของคุณ API ของโมเดลจะถูกจัดหาโดยเซสชัน IDE ของคุณ — ไม่จำเป็นต้องใช้คีย์เพิ่มเติม
| ตัวแปร | ใช้สำหรับ | เมื่อจำเป็น |
|---|---|---|
ANTHROPIC_API_KEY | แบ็กเอนด์ Claude (Anthropic) | --backend claude |
ANTHROPIC_BASE_URL | URL ปลายทางที่เข้ากันได้กับ Anthropic (LiteLLM proxy, gateways, ...) | --backend claude (ค่าเริ่มต้น: https://api.anthropic.com) |
ANTHROPIC_MODEL | ชื่อโมเดลสำหรับแบ็กเอนด์ Claude — สำหรับปลายทางที่กำหนดเอง ให้ใช้ชื่อโมเดล/นามแฝงที่เซิร์ฟเวอร์ของคุณเปิดเผย | --backend claude (ค่าเริ่มต้น: claude-sonnet-4-6) |
GEMINI_API_KEY หรือ GOOGLE_API_KEY | แบ็กเอนด์ Google Gemini | --backend gemini |
OPENAI_API_KEY | OpenAI หรือ API ที่เข้ากันได้กับ OpenAI | --backend openai (เซิร์ฟเวอร์โลคัลยอมรับค่าที่ไม่ว่างเปล่าใดๆ) |
OPENAI_BASE_URL | URL เซิร์ฟเวอร์ที่เข้ากันได้กับ OpenAI (llama.cpp, vLLM, LM Studio, ...) | --backend openai (ค่าเริ่มต้น: https://api.openai.com/v1) |
OPENAI_MODEL | ชื่อโมเดลสำหรับแบ็กเอนด์ OpenAI — สำหรับเซิร์ฟเวอร์ที่โฮสต์เอง ให้ใช้ชื่อโมเดล/นามแฝงที่เซิร์ฟเวอร์ของคุณเปิดเผย (ตรวจสอบปลายทาง /v1/models) เช่น LFM2.5-8B-A1B-UD-Q4_K_XL สำหรับ llama.cpp | --backend openai (ค่าเริ่มต้น: gpt-4.1-mini) |
DEEPSEEK_API_KEY | แบ็กเอนด์ DeepSeek | --backend deepseek |
MOONSHOT_API_KEY | แบ็กเอนด์ Kimi Code | --backend kimi |
OLLAMA_BASE_URL | URL การอนุมานโลคัลของ Ollama | --backend ollama (ค่าเริ่มต้น: http://localhost:11434) |
OLLAMA_MODEL | ชื่อโมเดล Ollama | --backend ollama (ค่าเริ่มต้น: ตรวจจับอัตโนมัติ) |
GRAPHIFY_OLLAMA_NUM_CTX | แทนที่ขนาดหน้าต่าง KV-cache ของ Ollama | ไม่บังคับ — ปรับขนาดอัตโนมัติโดยค่าเริ่มต้น |
GRAPHIFY_OLLAMA_KEEP_ALIVE | จำนวนนาทีที่จะเก็บโมเดล Ollama โหลดไว้ | ไม่บังคับ — ตั้งค่า 0 เพื่อยกเลิกการโหลดหลังจากแต่ละส่วน |
AZURE_OPENAI_API_KEY | แบ็กเอนด์ Azure OpenAI Service | --backend azure |
AZURE_OPENAI_ENDPOINT | URL ปลายทางทรัพยากร Azure | --backend azure (จำเป็นควบคู่กับ API key) |
AZURE_OPENAI_API_VERSION | การแทนที่เวอร์ชัน Azure API | ไม่บังคับ — ค่าเริ่มต้น 2024-12-01-preview |
AZURE_OPENAI_DEPLOYMENT หรือ GRAPHIFY_AZURE_MODEL | ชื่อการปรับใช้ Azure | ไม่บังคับ — ค่าเริ่มต้น gpt-4o |
AWS_* / ~/.aws/credentials | AWS Bedrock — เชนข้อมูลรับรองมาตรฐาน | --backend bedrock (ไม่มี API key, ใช้ IAM) |
GRAPHIFY_MAX_WORKERS | จำนวนเธรดสำหรับ AST parallelism | ไม่บังคับ — มีแฟล็ก --max-workers ด้วย |
GRAPHIFY_MAX_OUTPUT_TOKENS | เพิ่มขีดจำกัดเอาต์พุตสำหรับคลังข้อมูลหนาแน่น | ไม่บังคับ — เช่น 32768 สำหรับไฟล์ขนาดใหญ่ |
GRAPHIFY_API_TIMEOUT | การหมดเวลาต่อการเรียกเป็นวินาทีสำหรับแบ็กเอนด์ HTTP, claude-cli และ Anthropic SDK (ค่าเริ่มต้น: 600) | ไม่บังคับ — มีแฟล็ก --api-timeout ด้วย |
GRAPHIFY_MAX_RETRIES | จำนวนครั้งที่จะลองส่งคำขอที่ถูกจำกัดอัตรา (429) ซ้ำก่อนที่จะยอมแพ้ (ค่าเริ่มต้น: 6; เคารพ Retry-After) | ไม่บังคับ — เพิ่มสำหรับข้อจำกัดที่เข้มงวดต่อองค์กร (เช่น kimi); 0 ปิดใช้งาน |
GRAPHIFY_FORCE | บังคับสร้างกราฟใหม่แม้จะมีโหนดน้อยลง | ไม่บังคับ — มีแฟล็ก --force ด้วย |
GRAPHIFY_GOOGLE_WORKSPACE | เปิดใช้งานการส่งออก Google Workspace โดยอัตโนมัติ | ไม่บังคับ — ตั้งค่าเป็น 1 |
GRAPHIFY_TRIAGE_BACKEND | แบ็กเอนด์สำหรับ graphify prs --triage | ไม่บังคับ — ตรวจจับอัตโนมัติจากคีย์ที่มีอยู่ |
GRAPHIFY_TRIAGE_MODEL | การแทนที่โมเดลสำหรับการคัดแยก | ไม่บังคับ — เช่น claude-opus-4-7 |
GRAPHIFY_QUERY_LOG_ENABLE | ตั้งค่าเป็น 1 เพื่อเปิดบันทึกการสอบถามโลคัลที่ ~/.cache/graphify-queries.log (บันทึกคำถามการสอบถาม/พาธ/อธิบายแต่ละรายการ + พาธคลังข้อมูล) ปิดใช้งานโดยค่าเริ่มต้น — จะไม่มีการเขียนอะไรเลยเว้นแต่คุณจะเลือกใช้ (#1797) | ไม่บังคับ |
เอกสารโปรเจกต์
อ่านเอกสารต้นฉบับ
README วิธีติดตั้ง วิธีใช้งาน และข้อกำหนดจาก repository ต้นฉบับ

🇺🇸 English | 🇨🇳 简体中文 | 🇯🇵 日本語 | 🇰🇷 한국어 | 🇩🇪 Deutsch | 🇫🇷 Français | 🇪🇸 Español | 🇮🇳 हिन्दी | 🇧🇷 Português | 🇷🇺 Русский | 🇸🇦 العربية | 🇮🇷 فارسی | 🇮🇹 Italiano | 🇵🇱 Polski | 🇳🇱 Nederlands | 🇹🇷 Türkçe | 🇺🇦 Українська | 🇻🇳 Tiếng Việt | 🇮🇩 Bahasa Indonesia | 🇸🇪 Svenska | 🇬🇷 Ελληνικά | 🇷🇴 Română | 🇨🇿 Čeština | 🇫🇮 Suomi | 🇩🇰 Dansk | 🇳🇴 Norsk | 🇭🇺 Magyar | 🇹🇭 ภาษาไทย | 🇺🇿 Oʻzbekcha | 🇹🇼 繁體中文 | 🇵🇭 Filipino | 🇮🇱 עברית

Type /graphify in your AI coding assistant and it maps your entire project (code, docs, PDFs, images, videos) into a knowledge graph you can query instead of grepping through files.
- Code maps for free, fully local. Code is parsed with tree-sitter AST: deterministic, no LLM, nothing leaves your machine. (Docs, PDFs, images and video use your assistant's model, or a configured API key, for a semantic pass.)
- Every edge is explained. Each connection is tagged
EXTRACTED(explicit in the source) orINFERRED(resolved by graphify), so you can tell what was read directly from what was inferred. - Not a vector index. No embeddings, no vector store: a real graph you traverse. Ask a question, trace the path between two things, or explain one concept.
Want this always-on, updating in the background across your code, docs, and meetings rather than only on demand? That is what we are building at graphify.com, and early access is open now at app.graphify.com.
Get started (30 seconds):
uv tool install graphifyy      # install the CLI (or: pipx install graphifyy)
graphify install               # register the skill with your AI assistant
Then, in your AI assistant:
/graphify .That's it. You get three files:
graphify-out/
├── graph.html       open in any browser — click nodes, filter, search
├── GRAPH_REPORT.md  the highlights: key concepts, surprising connections, suggested questions
└── graph.json       the full graph — query it anytime without re-reading your files
Works in Claude Code, Cursor, Codex, Gemini CLI, GitHub Copilot, and 15+ more — pick your platform.
See it in action
Once the graph is built you query it instead of reading files. Real output, graphify run on the FastAPI codebase shown above:
$ graphify explain "APIRouter"
Node: APIRouter
  Source:    routing.py L2210
  Community: 2
  Degree:    47

Connections (47):
  --> RequestValidationError [uses] [INFERRED]
  --> Dependant [uses] [INFERRED]
  --> .get() [method] [EXTRACTED]
  <-- __init__.py [imports] [EXTRACTED]
  ...

$ graphify path "FastAPI" "ModelField"
Shortest path (3 hops):
  FastAPI --uses--> DefaultPlaceholder <--references-- get_request_handler() --references--> ModelField
Every edge carries a confidence tag (EXTRACTED = explicit in the source, INFERRED = derived by resolution), so you can tell what was read directly from what was inferred. graphify query "<question>" returns a scoped subgraph for a plain-language question, and graphify path A B traces how any two things connect.
What it does
What you get out of the box:
| Capability | What you get |
|---|---|
| God nodes | The most-connected concepts, so you see what everything flows through |
| Communities | The graph split into subsystems (Leiden), with LLM-free labels |
| Cross-file links | calls / imports / inherits / mixes_in resolved across ~40 languages via tree-sitter AST |
| Query, path, explain | Ask a question, trace the path between two things, or explain one concept, all against graph.json |
| Rationale + doc refs | # NOTE: / # WHY: comments and ADR/RFC citations become first-class nodes linked to the code |
| Beyond code | Docs, PDFs, images, and video/audio all map into the same graph |
| Local-first | Code is parsed locally with tree-sitter (no LLM, nothing leaves your machine); only the semantic pass over docs/media calls a backend, and only if you configure one |
Benchmarks
| Benchmark | Metric | graphify | Field |
|---|---|---|---|
| LOCOMO (n=300) | recall@10 | 0.497 | mem0 0.048, supermemory 0.149 |
| LOCOMO (n=300) | QA accuracy | 45.3% | supermemory 49.7%, mem0 27.3% |
| LongMemEval-S (n=50) | QA accuracy | 76% | tied with dense RAG |
| Graph build | LLM credits | 0 | per-token for most systems |
Every system ran on the same harness with the same model and budgets, scored by a judge blind-validated against a second judge (90.6% agreement, Cohen's kappa 0.81). Full per-system tables, the code-intelligence result, and reproduction commands: BENCHMARKS.md.
Prerequisites
| Requirement | Minimum | Check | Install |
|---|---|---|---|
| Python | 3.10+ | python --version | python.org |
| uv (recommended) | any | uv --version | curl -LsSf https://astral.sh/uv/install.sh | sh |
| pipx (alternative) | any | pipx --version | pip install pipx |
macOS quick install (Homebrew):
brew install python@3.12 uvWindows quick install:
winget install astral-sh.uvUbuntu/Debian:
sudo apt install python3.12 python3-pip pipx
# or install uv:
curl -LsSf https://astral.sh/uv/install.sh | sh
Install
Official package: The PyPI package is graphifyy (double-y). Other graphify* packages on PyPI are not affiliated. The CLI command is still graphify.
Step 1 — install the package:
# Recommended (isolated env; if 'graphify' isn't found after, run: uv tool update-shell):
uv tool install graphifyy

# Alternatives:
pipx install graphifyy
pip install graphifyy  # may need PATH setup — see note below
Step 2 — register the skill with your AI assistant:
graphify installThat's it. Open your AI assistant and type /graphify .
To install the assistant skill into the current repository instead of your user
profile, add --project:
graphify install --project
graphify install --project --platform codex
Project-scoped installs write under the current directory, for example
.claude/skills/graphify/SKILL.md or .agents/skills/graphify/SKILL.md (plus a
references/ sidecar the skill loads on demand), and
print a git add hint for files that can be committed.
Per-platform commands that support project-scoped installs accept the same flag,
for example graphify claude install --project or graphify codex install --project.
PowerShell note: Use graphify . not /graphify . — the leading slash is a path separator in PowerShell.
graphify: command not found? uv tool install / pipx install put the graphify command in their tool bin dir (~/.local/bin). If your shell can't find it right after install — common on a fresh macOS + zsh setup — that dir isn't on your PATH yet: run uv tool update-shell (or pipx ensurepath), then open a new terminal. With plain pip, add ~/.local/bin (Linux) or ~/Library/Python/3.x/bin (Mac) to your PATH, or run python -m graphify.
Running with uvx / uv tool run instead of installing? Name the package, not the command: uvx --from graphifyy graphify install. Plain uvx graphify … fails (No solution found … no versions of graphify) because uv tool run reads the first word as a package, and the package is graphifyy — the graphify command lives inside it.
Avoid pip install on Mac/Windows if possible. The skill resolves Python at runtime from graphify-out/.graphify_python; if that points to a different environment than where pip installed the package, you'll get ModuleNotFoundError: No module named 'graphify'. uv tool install and pipx install isolate the package in their own env and avoid this entirely.
Git hooks and uv tool / pipx: graphify hook install embeds the current interpreter path directly into the hook scripts at install time, so the post-commit hook fires correctly even in GUI git clients and CI runners where ~/.local/bin is not on PATH. If you reinstall or upgrade graphify, re-run graphify hook install to refresh the embedded path.
Strict mode (Claude Code): graphify install --project --strict makes the assistant actually use the graph. The default install nudges it to run graphify query before reading files; strict mode blocks the first raw source read of a session and redirects it to the graph, then reverts to the nudge (so it fires at most once per session and never gets stuck). Toggle at runtime with GRAPHIFY_HOOK_STRICT=1/0; the default install is unchanged (soft nudge).
| Platform | Install command |
|---|---|
| Claude Code (Linux/Mac) | graphify install |
| Claude Code (Windows) | graphify install (auto-detected) or graphify install --platform windows |
| CodeBuddy | graphify install --platform codebuddy |
| Codex | graphify install --platform codex |
| OpenCode | graphify install --platform opencode |
| Kilo Code | graphify install --platform kilo |
| GitHub Copilot CLI | graphify install --platform copilot |
| VS Code Copilot Chat | graphify vscode install |
| Aider | graphify install --platform aider |
| OpenClaw | graphify install --platform claw |
| Factory Droid | graphify install --platform droid |
| Trae | graphify install --platform trae |
| Trae CN | graphify install --platform trae-cn |
| Gemini CLI | graphify install --platform gemini |
| Hermes | graphify install --platform hermes |
| Kimi Code | graphify install --platform kimi |
| Amp | graphify amp install |
| Agent Skills (cross-framework) | graphify install --platform agents (alias --platform skills) |
| Kiro IDE/CLI | graphify kiro install |
| Pi coding agent | graphify install --platform pi |
| Cursor | graphify cursor install |
| Devin CLI | graphify devin install |
| Google Antigravity | graphify antigravity install |
Codex users also need multi_agent = true under [features] in ~/.codex/config.toml for parallel extraction. CodeBuddy uses the same Agent tool and PreToolUse hook mechanism as Claude Code. Factory Droid uses the Task tool for parallel subagent dispatch. OpenClaw and Aider use sequential extraction (parallel agent support is still early on those platforms). Trae uses the Agent tool for parallel subagent dispatch and does not support PreToolUse hooks, so AGENTS.md is the always-on mechanism.
--platform agents (alias --platform skills) targets the generic cross-framework Agent-Skills locations: the spec's user-global ~/.agents/skills/ (read by npx skills and spec-compliant frameworks) for a global install, and ./.agents/skills/ for a project (--project) install. The bare graphify install stays single-platform (Claude Code) by design — use the named agents platform when you want the skill discoverable by any framework that reads .agents/skills.
Codex uses $graphify instead of /graphify.
| Extra | What it adds | Install |
|---|---|---|
pdf | PDF extraction | uv tool install "graphifyy[pdf]" |
office | .docx and .xlsx support | uv tool install "graphifyy[office]" |
google | Google Sheets rendering | uv tool install "graphifyy[google]" |
video | Video/audio transcription (faster-whisper + yt-dlp) | uv tool install "graphifyy[video]" |
mcp | MCP stdio server | uv tool install "graphifyy[mcp]" |
neo4j | Neo4j push support | uv tool install "graphifyy[neo4j]" |
falkordb | FalkorDB push support | uv tool install "graphifyy[falkordb]" |
svg | SVG graph export | uv tool install "graphifyy[svg]" |
leiden | Leiden community detection (graspologic on Python < 3.13; native backend on 3.13+) | uv tool install "graphifyy[leiden]" |
ollama | Ollama local inference | uv tool install "graphifyy[ollama]" |
openai | OpenAI / OpenAI-compatible APIs | uv tool install "graphifyy[openai]" |
gemini | Google Gemini API | uv tool install "graphifyy[gemini]" |
anthropic | Anthropic Claude API (--backend claude, uses ANTHROPIC_API_KEY) | uv tool install "graphifyy[anthropic]" |
bedrock | AWS Bedrock (uses IAM, no API key) | uv tool install "graphifyy[bedrock]" |
azure | Azure OpenAI Service (--backend azure, uses AZURE_OPENAI_API_KEY + AZURE_OPENAI_ENDPOINT) | uv tool install "graphifyy[openai]" |
sql | SQL schema extraction | uv tool install "graphifyy[sql]" |
postgres | Live PostgreSQL introspection (--postgres DSN) | uv tool install "graphifyy[postgres]" |
dm | BYOND DreamMaker .dm/.dme AST extraction (may need a C compiler + python3-dev if no wheel matches your platform) | uv tool install "graphifyy[dm]" |
terraform | Terraform / HCL .tf/.tfvars/.hcl AST extraction | uv tool install "graphifyy[terraform]" |
pascal | Pascal / Delphi .pas/.dpr/.dpk/.inc AST extraction (more accurate calls/inherits edges; falls back to a regex extractor when absent) | uv tool install "graphifyy[pascal]" |
ocaml | OCaml .ml/.mli AST extraction | uv tool install "graphifyy[ocaml]" |
commonlisp | Common Lisp .lisp/.cl/.lsp/.asd AST extraction | uv tool install "graphifyy[commonlisp]" |
robot | Robot Framework .robot/.resource extraction (suites, test cases, keywords, keyword-call and resource/library import edges) | uv tool install "graphifyy[robot]" |
chinese | Chinese query segmentation (jieba) | uv tool install "graphifyy[chinese]" |
all | Everything above | uv tool install "graphifyy[all]" |
Make your assistant always use the graph
Run this once in your project after building a graph:
| Platform | Command |
|---|---|
| Claude Code | graphify claude install |
| CodeBuddy | graphify codebuddy install |
| Codex | graphify codex install |
| OpenCode | graphify opencode install |
| Kilo Code | graphify kilo install |
| GitHub Copilot CLI | graphify copilot install |
| VS Code Copilot Chat | graphify vscode install |
| Aider | graphify aider install |
| OpenClaw | graphify claw install |
| Factory Droid | graphify droid install |
| Trae | graphify trae install |
| Trae CN | graphify trae-cn install |
| Cursor | graphify cursor install |
| Gemini CLI | graphify gemini install |
| Hermes | graphify hermes install |
| Kimi Code | graphify install --platform kimi |
| Amp | graphify amp install |
| Agent Skills (cross-framework) | graphify agents install (alias graphify skills install) |
| Kiro IDE/CLI | graphify kiro install |
| Pi coding agent | graphify pi install |
| Devin CLI | graphify devin install |
| Google Antigravity | graphify antigravity install |
This writes a small config file that tells your assistant to consult the knowledge graph for codebase questions, preferring scoped queries like graphify query "<question>" over reading the full report or grepping raw files.
- Hook platforms (Claude Code, Gemini CLI): a hook fires automatically before search-style tool calls (and, on Claude Code, before reading source files one by one via the Read/Glob tools) and nudges your assistant toward the graph path.
- Instruction-file platforms (Codex, OpenCode, Cursor, etc.): persistent instruction files (
AGENTS.md,.cursor/rules/, etc.) provide the same query-first guidance.
GRAPH_REPORT.md is still available for broad architecture review.
CodeBuddy does the same two things as Claude Code: writes a CODEBUDDY.md section telling CodeBuddy to read graphify-out/GRAPH_REPORT.md before answering architecture questions, and installs PreToolUse hooks (.codebuddy/settings.json) that fire before Bash search commands and file reads, nudging toward graphify query instead.
Codex writes to AGENTS.md, which is what actually carries the always-on graph guidance on this platform. graphify codex install also registers a PreToolUse hook in .codex/hooks.json (graphify hook-check), but that entry is deliberately a no-op: Codex Desktop rejects hookSpecificOutput.additionalContext on PreToolUse, so emitting a nudge there would break Bash tool calls. Unlike Claude Code, where the hook (graphify hook-guard) does the nudging, on Codex the hook fires and intentionally does nothing, and AGENTS.md is the always-on mechanism.
Kilo Code installs the Graphify skill to ~/.config/kilo/skills/graphify/SKILL.md and a native /graphify command to ~/.config/kilo/command/graphify.md. graphify kilo install also writes AGENTS.md plus a native tool.execute.before plugin (.kilo/plugins/graphify.js + .kilo/kilo.json or .kilo/kilo.jsonc registration) so Kilo gets the same always-on graph reminder behavior through native .kilo config.
Cursor writes .cursor/rules/graphify.mdc with alwaysApply: true, so Cursor includes it in every conversation automatically, no hook needed.
To remove graphify from all platforms at once: graphify uninstall (add --purge to also delete graphify-out/). Or use the per-platform command (e.g. graphify claude uninstall).
What's in the report
- God nodes — the most-connected concepts in your project. Everything flows through these.
- Surprising connections — links between things that live in different files or modules. Ranked by how unexpected they are.
- The "why" — inline comments (
# NOTE:,# WHY:,# HACK:), docstrings, and design rationale from docs are extracted as separate nodes linked to the code they explain. - Suggested questions — 4–5 questions the graph is uniquely positioned to answer.
- Confidence tags — every inferred relationship is marked
EXTRACTED,INFERRED, orAMBIGUOUS. You always know what was found vs guessed.
What files it handles
| Type | Extensions |
|---|---|
| Code (37 tree-sitter grammars) | .py .ts .mts .cts .js .jsx .tsx .mjs .go .rs .java .c .cpp .cc .cxx .h .hpp .cu .cuh .metal .rb .cs .kt .kts .scala .php .swift .lua .luau .toc .zig .ps1 .psm1 .psd1 .ex .exs .m .mm .ml .mli .jl .vue .svelte .astro .groovy .gradle .dart .v .sv .svh .sql .f .f90 .f95 .f03 .f08 .pas .pp .dpr .dpk .lpr .inc .dfm .lfm .lpk .sh .bash .json .dm .dme .dmi .dmm .dmf .sln .slnx .csproj .fsproj .vbproj .xaml .razor .cshtml (.dm/.dme requires uv tool install graphifyy[dm], .ml/.mli requires uv tool install graphifyy[ocaml]; .mts/.cts reuse the TypeScript grammar, .cc/.cxx and CUDA .cu/.cuh and Metal .metal reuse the C++ grammar) |
| Salesforce Apex | .cls .trigger (regex-based; classes, interfaces, enums, methods, triggers, SOQL/DML edges) |
| Terraform / HCL | .tf .tfvars .hcl (requires uv tool install graphifyy[terraform]) |
| OCaml | .ml .mli (requires uv tool install graphifyy[ocaml]) |
| Common Lisp | .lisp .cl .lsp .asd (requires uv tool install graphifyy[commonlisp]) |
| Robot Framework | .robot .resource (via the official robot.api parser, requires uv tool install graphifyy[robot]; suites, test cases, user keywords, keyword-call and Resource/Library/Variables import edges) |
| MCP configs | .mcp.json mcp.json mcp_servers.json claude_desktop_config.json — extracts server nodes, package refs, env var requirements |
| Package manifests | apm.yml pyproject.toml go.mod pom.xml — one canonical package node per package (by name) plus depends_on edges, so a package referenced from many manifests is a single hub |
| Docs | .md .mdx .qmd .html .txt .rst .yaml .yml (markdown [text](https://github.com/Graphify-Labs/graphify/blob/v8/other.md) links and [[wikilinks]] become references edges between docs) |
| Office | .docx .xlsx (requires uv tool install graphifyy[office]) |
| Google Workspace | .gdoc .gsheet .gslides (opt-in; requires gws auth and --google-workspace; Sheets need uv tool install graphifyy[google]) |
| PDFs | .pdf |
| Images | .png .jpg .webp .gif |
| Video / Audio | .mp4 .mov .mp3 .wav and more (requires uv tool install graphifyy[video]) |
| YouTube / URLs | any video URL (requires uv tool install graphifyy[video]) |
Code is extracted locally with no API calls (AST via tree-sitter). Everything else goes through your AI assistant's model API.
Google Drive for desktop .gdoc, .gsheet, and .gslides files are shortcut
pointers, not document content. To include native Google Docs, Sheets, and Slides
in a headless extraction, install and authenticate the
gws CLI, then run:
uv tool install "graphifyy[google]"  # needed for Google Sheets table rendering
gws auth login -s drive
graphify extract ./docs --google-workspace
You can also set GRAPHIFY_GOOGLE_WORKSPACE=1. Graphify exports shortcuts into
graphify-out/converted/ as Markdown sidecars, then extracts those files.
Common commands
/graphify .                        # build graph for current folder
/graphify ./docs --update          # re-extract only changed files
/graphify . --cluster-only         # rerun clustering without re-extracting
/graphify . --cluster-only --resolution 1.5      # more granular communities
/graphify . --cluster-only --exclude-hubs 99     # suppress utility super-hubs from god-node rankings
/graphify . --no-viz               # skip the HTML, just the report + JSON
/graphify . --wiki                 # build a markdown wiki from the graph
graphify export callflow-html      # Mermaid architecture/call-flow HTML (auto-regenerates on every git commit if hook is installed)

/graphify query "what connects auth to the database?"
/graphify path "UserService" "DatabasePool"
/graphify explain "RateLimiter"

/graphify add https://arxiv.org/abs/1706.03762   # fetch a paper and add it
/graphify add <youtube-url>                       # transcribe and add a video

graphify hook install              # auto-rebuild on commit + branch checkout (run `graphify update .` after `git pull` — see "Recommended workflow" below)
graphify merge-graphs a.json b.json              # combine two graphs

graphify prs                       # PR dashboard: CI state, review status, worktree mapping
graphify prs 42                    # deep dive on PR #42 with graph impact
graphify prs --triage              # AI ranks your review queue (uses whatever backend is configured)
graphify prs --conflicts           # PRs sharing graph communities — merge-order risk
See the full command reference below.
Ignoring files
Create a .graphifyignore in your project root — same syntax as .gitignore, including ! negation.
.gitignore is respected automatically. graphify reads the .gitignore in each directory. If a .graphifyignore is also present, the two are merged — .graphifyignore patterns are evaluated last, so they win on conflicts (including ! negations). Adding a .graphifyignore only ever excludes more; it never re-includes a file your .gitignore already excluded. Subdirectory scoping works the same way as git — an ignore file only affects its own subtree.
Pass --no-gitignore to graphify extract when git-ignored generated or transpiled code belongs in the graph. This disables .gitignore and .git/info/exclude; .graphifyignore still applies.
# .graphifyignore
node_modules/
dist/
*.generated.py

# only index src/, ignore everything else
*
!src/
!src/**
Team setup
graphify-out/ is meant to be committed to git so everyone on the team starts with a map.
Recommended .gitignore additions:
graphify-out/cost.json        # local only
# graphify-out/cache/         # optional: commit for speed, skip to keep repo small
manifest.json is now portable — keys are stored as relative paths and re-anchored on load, so committing it is safe and avoids a full rebuild on first checkout.
Recommended workflow
Set this up once per clone. From then on, three of your normal git commands keep the graph current by themselves, and one keeps it in sync with your team:
| you do | graphify does |
|---|---|
graphify hook install (once, right after cloning) | installs the hooks below, plus a merge driver so graph.json never shows conflict markers |
git commit | rebuilds automatically — AST only, no API cost |
git checkout / git switch (branches) | rebuilds automatically (a file-only git checkout -- <path> does not) |
git pull / git merge | run graphify update . right after |
git push | nothing to do |
The commit and branch-switch rebuilds run in the background and return immediately, so on a large repo the graph can lag the commit by a few seconds — step 5 covers the rare case where you query before it catches up.
Step by step:
- 1Clone the repo and run
graphify hook installonce. - 2Commit and switch branches as normal — the graph stays current on its own.
- 3After every
git pull(or merge), rungraphify update .to bring the graph in sync with what you just pulled. On a large or active repo, put it on autopilot with a pull alias:git config --global alias.gpull '!git pull && graphify update .' - 4When docs or papers change, run
/graphify --updateto refresh those nodes too (code and docs update independently). - 5If a query ever seems to be missing something you just added, run
graphify update .first, then ask again.
Using the graph directly
# query the graph from the terminal
graphify query "show the auth flow"
graphify query "what connects DigestAuth to Response?" --graph graphify-out/graph.json

# expose the graph as an MCP server (for repeated tool-call access)
python -m graphify.serve graphify-out/graph.json
python -m graphify.serve --graph graphify-out/graph.json  # --graph flag also accepted

# register with Kimi Code:
kimi mcp add --transport stdio graphify -- python -m graphify.serve graphify-out/graph.json

# or serve over HTTP so a whole team points at one URL (no local graphify needed):
python -m graphify.serve graphify-out/graph.json --transport http --port 8080
python -m graphify.serve graphify-out/graph.json --transport http --host 0.0.0.0 --api-key "$SECRET"
The MCP server gives your assistant structured access: query_graph, get_node, get_neighbors, shortest_path, list_prs, get_pr_impact, triage_prs.
Shared HTTP server
--transport stdio (the default) spawns one local server per developer. --transport http serves the same tools over the MCP Streamable HTTP transport, so a single shared process can serve the graph for the whole team — clients point their IDE MCP config at http://<host>:8080/mcp instead of running graphify locally.
| Flag | Default | Purpose |
|---|---|---|
--transport {stdio,http} | stdio | Transport to serve on |
--host | 127.0.0.1 | HTTP bind host (use 0.0.0.0 to expose beyond localhost) |
--port | 8080 | HTTP bind port |
--api-key | env GRAPHIFY_API_KEY | Require Authorization: Bearer <key> (or X-API-Key) |
--path | /mcp | HTTP mount path |
--json-response | off | Return plain JSON instead of SSE streams |
--stateless | off | No per-session state (for load-balanced / CI deployments) |
--session-timeout | 3600 | Reap idle stateful sessions after N seconds (0 disables) |
The default 127.0.0.1 bind is loopback-only. Set --host 0.0.0.0 and --api-key together when exposing on a shared host. Run it in a container:
docker build -t graphify .
docker run -p 8080:8080 -v "$(pwd)/graphify-out:/data" graphify \
  /data/graph.json --transport http --host 0.0.0.0 --api-key "$SECRET"
WSL / Linux note: Ubuntu ships python3, not python. Use a venv to avoid conflicts:
python3 -m venv .venv && .venv/bin/pip install "graphifyy[mcp]"Environment variables
These are only needed for headless / CI extraction (graphify extract). When running via the /graphify skill inside your IDE, the model API is provided by your IDE session — no extra keys needed.
| Variable | Used for | When required |
|---|---|---|
ANTHROPIC_API_KEY | Claude (Anthropic) backend | --backend claude |
ANTHROPIC_BASE_URL | Anthropic-compatible endpoint URL (LiteLLM proxy, gateways, ...) | --backend claude (default: https://api.anthropic.com) |
ANTHROPIC_MODEL | Model name for the Claude backend — for custom endpoints, use the model name/alias your server exposes | --backend claude (default: claude-sonnet-4-6) |
GEMINI_API_KEY or GOOGLE_API_KEY | Google Gemini backend | --backend gemini |
OPENAI_API_KEY | OpenAI or OpenAI-compatible APIs | --backend openai (local servers accept any non-empty value) |
OPENAI_BASE_URL | OpenAI-compatible server URL (llama.cpp, vLLM, LM Studio, ...) | --backend openai (default: https://api.openai.com/v1) |
OPENAI_MODEL | Model name for the OpenAI backend — for self-hosted servers, use the model name/alias your server exposes (check its /v1/models endpoint), e.g. LFM2.5-8B-A1B-UD-Q4_K_XL for llama.cpp | --backend openai (default: gpt-4.1-mini) |
DEEPSEEK_API_KEY | DeepSeek backend | --backend deepseek |
MOONSHOT_API_KEY | Kimi Code backend | --backend kimi |
OLLAMA_BASE_URL | Ollama local inference URL | --backend ollama (default: http://localhost:11434) |
OLLAMA_MODEL | Ollama model name | --backend ollama (default: auto-detect) |
GRAPHIFY_OLLAMA_NUM_CTX | Override Ollama KV-cache window size | optional — auto-sized by default |
GRAPHIFY_OLLAMA_KEEP_ALIVE | Minutes to keep Ollama model loaded | optional — set 0 to unload after each chunk |
AZURE_OPENAI_API_KEY | Azure OpenAI Service backend | --backend azure |
AZURE_OPENAI_ENDPOINT | Azure resource endpoint URL | --backend azure (required alongside API key) |
AZURE_OPENAI_API_VERSION | Azure API version override | optional — default 2024-12-01-preview |
AZURE_OPENAI_DEPLOYMENT or GRAPHIFY_AZURE_MODEL | Azure deployment name | optional — default gpt-4o |
AWS_* / ~/.aws/credentials | AWS Bedrock — standard credential chain | --backend bedrock (no API key, uses IAM) |
GRAPHIFY_MAX_WORKERS | AST parallelism thread count | optional — also --max-workers flag |
GRAPHIFY_MAX_OUTPUT_TOKENS | Raise output cap for dense corpora | optional — e.g. 32768 for large files |
GRAPHIFY_API_TIMEOUT | Per-call timeout in seconds for HTTP, claude-cli, Anthropic SDK, and Bedrock backends (default: 600) | optional — also --api-timeout flag |
GRAPHIFY_MAX_RETRIES | How many times to retry a rate-limited (429) request before giving up (default: 6; honors Retry-After) | optional — raise for strict per-org limits (e.g. kimi); 0 disables |
GRAPHIFY_MAX_RETRY_DEPTH | How deep a truncated chunk may be bisected and re-extracted (default: 3, so up to 8x sub-calls for one chunk) | optional — lower it to cap worst-case spend; 0 disables every retry (no bisection, no hollow-response retry), so a chunk costs exactly one call |
GRAPHIFY_FORCE | Force graph rebuild even with fewer nodes | optional — also --force flag |
GRAPHIFY_GOOGLE_WORKSPACE | Auto-enable Google Workspace export | optional — set to 1 |
GRAPHIFY_TRIAGE_BACKEND | Backend for graphify prs --triage | optional — auto-detected from available keys |
GRAPHIFY_TRIAGE_MODEL | Model override for triage | optional — e.g. claude-opus-4-7 |
GRAPHIFY_QUERY_LOG_ENABLE | Set to 1 to turn on the local query log at ~/.cache/graphify-queries.log (records each query/path/explain question + corpus path). Off by default — nothing is written unless you opt in (#1797) | optional |
GRAPHIFY_QUERY_LOG | Enable the query log and write it to this path instead of the default | optional — off unless this or _ENABLE is set |
GRAPHIFY_QUERY_LOG_DISABLE | Set to 1 to force the query log off (wins over the enable vars) | optional |
GRAPHIFY_QUERY_LOG_RESPONSES | When the log is enabled, also record full subgraph responses (off by default) | optional |
GRAPHIFY_MAX_GRAPH_BYTES | Override the 512 MiB graph.json size cap — e.g. 700MB, 2GB, or plain bytes | optional — useful for very large corpora |
GRAPHIFY_MAX_CONTEXTS | Maximum number of non-default project graphs retained by one multi-project MCP server | optional — default: 8; invalid values use 8, and values below 1 use 1 |
GRAPHIFY_LLM_TEMPERATURE | Override LLM temperature for semantic extraction — e.g. 0.7, or none to omit | optional — auto-omitted for o1/o3/o4/gpt-5 reasoning models |
Privacy
- Code files — processed locally via tree-sitter. Nothing leaves your machine. A code-only corpus requires no API key —
graphify extractruns fully offline. On a mixed repo, add--code-onlyto index just the code and skip the docs/PDFs/images that would otherwise need an LLM. - Video / audio — transcribed locally with faster-whisper. Nothing leaves your machine.
- Docs, PDFs, images — sent to your AI assistant for semantic extraction (via the
/graphifyskill, using whatever model your IDE session runs). Headlessgraphify extractrequiresGEMINI_API_KEY/GOOGLE_API_KEY(Gemini),MOONSHOT_API_KEY(Kimi),ANTHROPIC_API_KEY(Claude),OPENAI_API_KEY(OpenAI),DEEPSEEK_API_KEY(DeepSeek), a running Ollama instance (OLLAMA_BASE_URL), AWS credentials via the standard provider chain (Bedrock - no API key needed, uses IAM), or theclaudeCLI binary (Claude Code - no API key needed, uses your Claude subscription). The--dedup-llmflag uses the same key. - Data residency —
graphify extractauto-detects which provider to use based on which API key is set (priority: Gemini → Kimi → Claude → OpenAI → DeepSeek → Azure → Bedrock → Ollama). For code with data-residency requirements, use--backend ollama(fully local) or pass an explicit--backendflag. Kimi (MOONSHOT_API_KEY) routes to Moonshot AI servers in China. - No telemetry, no usage tracking, no analytics.
- Query logging — every
graphify query,graphify path,graphify explain, and MCPquery_graphcall is logged to~/.cache/graphify-queries.login JSON Lines format (timestamp, question, corpus, nodes returned, duration). Full subgraph responses are not stored by default. SetGRAPHIFY_QUERY_LOG_DISABLE=1to opt out, orGRAPHIFY_QUERY_LOG=/dev/nullto silence without disabling the code path.
Troubleshooting
graphify: command not found after installing
The CLI is installed but its bin directory isn't on your shell's PATH. Pick the fix for how you installed:
- uv (
uv tool install graphifyy): the command lands in uv's tool bin dir (~/.local/bin), which a fresh macOS/zsh setup often doesn't have onPATH. Runuv tool update-shell, then open a new terminal. (Find the dir withuv tool dir --bin.) - pipx (
pipx install graphifyy): runpipx ensurepath, then open a new terminal. - pip (
pip install graphifyy): pip installs scripts to a user bin dir that may not be onPATH— add~/Library/Python/3.x/bin(macOS) or~/.local/bin(Linux) to yourPATHin~/.zshrc/~/.bashrc, or just runpython -m graphify.
uvx graphify … or uv tool run graphify … fails to resolve graphify
The PyPI package is graphifyy; graphify is only the command it provides. uv tool run treats the first word as a package name, so it looks for a package called graphify and reports No solution found … no versions of graphify. Name the package explicitly: uvx --from graphifyy graphify install (same as uv tool run --from graphifyy graphify install). Or uv tool install graphifyy once and then call graphify directly.
uv run --with graphifyy python -m graphify silently runs an older install
uv run uses your system Python, so if an older graphifyy also lives there (e.g. a past pip install graphifyy), Python can find that copy first on sys.path and --with graphifyy won't override it. It runs with no error, but you get the old version's behavior — e.g. env overrides like OPENAI_BASE_URL are silently ignored, so requests hit the default endpoint and fail with a 401 that looks like a bad key. The fingerprint is a warning: skill is from graphify <newer>, package is <older> line — that means a different install was loaded, not just a stale skill. Check which copy actually loaded:
python -c "import graphify; print(graphify.__file__)"Then run the installed command directly (it uses the uv-managed copy), or drop the stale system copy:
uvx --from graphifyy graphify extract . --backend openai   # names the package explicitly
pip uninstall graphifyy                                    # or remove the old system install
python -m graphify works but graphify command doesn't
Your shell's PATH doesn't include the bin directory the command was installed to. Prefer uv tool install / pipx install over plain pip, then run uv tool update-shell / pipx ensurepath and open a new terminal (see the install notes above).
/graphify . causes "path not recognized" in PowerShell
PowerShell treats a leading / as a path separator. Use graphify . (no slash) on Windows.
Graph has fewer nodes after --update or rebuild
If a refactor deleted files, the old nodes linger. Pass --force (or set GRAPHIFY_FORCE=1) to overwrite even when the rebuild has fewer nodes.
extract exits with "extraction was incomplete ... refusing to overwrite"
When an extraction pass crashes or a walk can't fully read the corpus, the run would be smaller than a complete one, so graphify extract refuses to overwrite a larger existing graph with the partial result (protecting your graph.json). Fix the underlying failure and re-run, or pass --allow-partial to overwrite anyway.
Graph has duplicate nodes for the same entity (ghost duplicates) Ghost duplicates (same symbol appearing twice — once from AST extraction with a source location, once from semantic extraction without) are now automatically merged at build time. If you see this in a graph built before v0.8.33, run a full re-extract to clean up:
graphify extract . --forceOllama runs out of VRAM / context window exceeded The KV-cache window is auto-sized but may be too large for your GPU. Reduce it:
GRAPHIFY_OLLAMA_NUM_CTX=8192 graphify extract ./docs --backend ollama --token-budget 4000LLM returned invalid JSON / Unterminated string warnings
The model's JSON response hit its output-token limit and was cut off mid-string. graphify auto-recovers (it splits the chunk and re-extracts the halves, and an oversized single document is first sliced at heading/paragraph boundaries so the whole file is still covered), so these warnings are noisy but not data loss. To reduce the churn, raise the output cap or shrink each chunk's output:
GRAPHIFY_MAX_OUTPUT_TOKENS=16384 graphify extract . --mode deep   # lift the cap
graphify extract . --mode deep --token-budget 4000                # smaller input chunks -> smaller output
With a cloud gateway like OpenRouter, prefer --backend openai (set OPENAI_BASE_URL) over the Ollama shim — it's a cleaner OpenAI-compatible path. If the model has its own max-output ceiling, lowering --token-budget is the reliable lever.
Graph HTML is too large to open in a browser (>5000 nodes) Skip HTML generation and use the JSON directly:
graphify cluster-only ./my-project --no-viz
graphify query "..."
graph.json has conflict markers after two devs commit at once
Run graphify hook install — it sets up a git merge driver that union-merges graph.json automatically so conflicts never happen.
Graph doesn't reflect a teammate's recent changes
Run graphify update . right after git pull or any merge — see Recommended workflow. Commits and branch switches update the graph automatically via the installed hooks; syncing with a pull is the one step you run yourself. Fold it into a pull alias so it's one command either way:
git config --global alias.gpull '!git pull && graphify update .'Confirm the hooks are active with graphify hook status; re-run graphify hook install after an interpreter upgrade/reinstall to refresh them.
Extraction returns empty nodes/edges for docs or PDFs Docs, PDFs, and images require an LLM call — code-only corpora need no key. Check that your API key is set and the backend is correct:
ANTHROPIC_API_KEY=sk-... graphify extract ./docs --backend claudeSkill version mismatch warning in your IDE Your installed graphify version is different from the skill file. Update:
uv tool upgrade graphifyy
graphify install  # overwrites the skill file
Claude Code prompt cache invalidated after every graphify extract
Graphify writes output files (graph.json, graphify-out/) into the workspace. If those paths aren't ignored, every write invalidates Claude Code's prompt cache, forcing a full re-upload at cache-write rates on the next turn. Add them to .claudeignore:
# .claudeignore
graph.json
graphify-out/
Full command reference
/graphify                          # run on current directory
/graphify ./raw                    # run on a specific folder
/graphify ./raw --mode deep        # more aggressive relationship extraction
graphify extract ./raw --code-only # index code only — local AST, no API key (skips docs/PDFs/images); an `extract` flag, not a skill flag
/graphify ./raw --update           # re-extract only changed files
/graphify ./raw --directed         # preserve edge direction
/graphify ./raw --cluster-only     # rerun clustering on existing graph
/graphify ./raw --no-viz           # skip HTML visualization
/graphify ./raw --obsidian         # generate Obsidian vault
/graphify ./raw --obsidian --obsidian-dir ~/vault  # write into an existing vault (never overwrites your own notes or .obsidian config)
/graphify ./raw --wiki             # build agent-crawlable markdown wiki
/graphify ./raw --svg              # export graph.svg
/graphify ./raw --graphml          # export for Gephi / yEd
/graphify ./raw --neo4j            # generate cypher.txt for Neo4j
/graphify ./raw --neo4j-push bolt://localhost:7687
/graphify ./raw --falkordb         # generate cypher.txt for FalkorDB
/graphify ./raw --falkordb-push falkordb://localhost:6379
/graphify ./raw --watch            # auto-sync as files change
/graphify ./raw --mcp              # start MCP stdio server

/graphify add https://arxiv.org/abs/1706.03762
/graphify add <video-url>
/graphify add https://... --author "Name" --contributor "Name"

/graphify query "what connects attention to the optimizer?"
/graphify query "..." --dfs --budget 1500
/graphify path "DigestAuth" "Response"
/graphify explain "SwinTransformer"

graphify save-result --question "Q" --answer "A" --nodes Foo Bar --outcome useful   # record how a Q&A turned out (work memory; outcome ∈ useful|dead_end|corrected)
graphify reflect                   # aggregate graphify-out/memory/ outcomes into reflections/LESSONS.md
graphify reflect --if-stale        # no-op when LESSONS.md is already newer than every input (cheap to run each session)
graphify reflect --out docs/LESSONS.md    # write the lessons doc somewhere else
graphify reflect --graph graphify-out/graph.json  # group lessons by community + write the work-memory overlay (.graphify_learning.json)
                                   # the overlay tags nodes preferred/tentative/contested (recency-weighted, with provenance);
                                   # graphify explain / query then show a "Lesson:" hint, flagged "code changed — re-verify" when the source moved on

graphify uninstall                 # remove from all platforms in one shot
graphify uninstall --purge         # also delete graphify-out/
graphify uninstall --project --platform codex  # remove project-scoped install files only

graphify hook install              # post-commit + post-checkout hooks
graphify hook uninstall
graphify hook status

# always-on assistant instructions - platform-specific
graphify claude install            # CLAUDE.md + PreToolUse hook (Claude Code)
graphify claude uninstall
graphify codebuddy install         # CODEBUDDY.md + PreToolUse hook (CodeBuddy)
graphify codebuddy uninstall
graphify codex install             # AGENTS.md + PreToolUse hook in .codex/hooks.json (Codex)
graphify opencode install          # AGENTS.md + tool.execute.before plugin (OpenCode)
graphify kilo install              # native Kilo skill + /graphify command + AGENTS.md + .kilo plugin
graphify kilo uninstall
graphify cursor install            # .cursor/rules/graphify.mdc (Cursor)
graphify cursor uninstall
graphify gemini install            # GEMINI.md + BeforeTool hook (Gemini CLI)
graphify gemini uninstall
graphify copilot install           # skill file (GitHub Copilot CLI)
graphify copilot uninstall
graphify aider install             # AGENTS.md (Aider)
graphify aider uninstall
graphify claw install              # AGENTS.md (OpenClaw)
graphify claw uninstall
graphify droid install             # AGENTS.md (Factory Droid)
graphify droid uninstall
graphify trae install              # AGENTS.md (Trae)
graphify trae uninstall
graphify trae-cn install           # AGENTS.md (Trae CN)
graphify trae-cn uninstall
graphify hermes install             # AGENTS.md + ~/.hermes/skills/ (Hermes)
graphify hermes uninstall
graphify amp install               # skill file (Amp)
graphify amp uninstall
graphify agents install            # ~/.agents/skills/ + AGENTS.md (cross-framework; alias: graphify skills)
graphify agents uninstall
graphify kiro install               # .kiro/skills/ + .kiro/steering/graphify.md (Kiro IDE/CLI)
graphify kiro uninstall
graphify pi install                # skill file (Pi coding agent)
graphify pi uninstall
graphify devin install             # skill file + .windsurf/rules/graphify.md (Devin CLI)
graphify devin uninstall
graphify antigravity install       # .agents/rules + .agents/workflows (Google Antigravity)
graphify antigravity uninstall

graphify extract ./docs                        # headless LLM extraction for CI (no IDE needed)
graphify extract ./docs --backend gemini       # explicit backend: gemini, kimi, claude, openai, deepseek, ollama, bedrock, or claude-cli
graphify extract ./docs --backend gemini --model gemini-3.1-pro-preview
graphify extract ./docs --backend ollama       # local Ollama (set OLLAMA_BASE_URL / OLLAMA_MODEL) - no API key needed for loopback
OPENAI_BASE_URL=http://localhost:8080/v1 OPENAI_MODEL=my-model graphify extract ./docs --backend openai   # any OpenAI-compatible server (llama.cpp, vLLM, LM Studio)
ANTHROPIC_BASE_URL=http://localhost:4000 ANTHROPIC_MODEL=my-model graphify extract ./docs --backend claude   # any Anthropic-compatible endpoint (LiteLLM proxy, gateways)
GRAPHIFY_OLLAMA_NUM_CTX=32768 graphify extract ./docs --backend ollama   # override KV-cache window (auto-sized by default)
GRAPHIFY_OLLAMA_KEEP_ALIVE=0 graphify extract ./docs --backend ollama    # unload model after each chunk (saves VRAM on small GPUs)
graphify extract ./docs --backend bedrock      # AWS Bedrock via IAM - no API key, uses AWS credential chain
graphify extract ./docs --backend claude-cli   # route through Claude Code CLI - no API key, uses your Claude subscription
graphify extract ./docs --backend azure        # Azure OpenAI (set AZURE_OPENAI_API_KEY + AZURE_OPENAI_ENDPOINT)
graphify extract ./docs --max-workers 16       # AST parallelism (also GRAPHIFY_MAX_WORKERS)
graphify extract --postgres "postgresql://user:pass@host/db"   # introspect live PostgreSQL schema directly
graphify extract ./my-workspace --cargo        # introspect Rust Cargo workspace dependencies directly
graphify extract ./docs --token-budget 30000   # smaller semantic chunks for local/small models
graphify extract ./docs --max-concurrency 2    # fewer parallel LLM calls (useful for local inference)
graphify extract ./docs --api-timeout 900      # longer HTTP timeout for slow local models (default 600s)
graphify extract ./docs --google-workspace     # export .gdoc/.gsheet/.gslides via gws before extraction
graphify extract ./src --no-gitignore          # include git-ignored source; still honor .graphifyignore
graphify extract ./docs --mode deep            # richer semantic extraction via extended system prompt
graphify extract ./docs --no-cluster           # raw extraction only, skip clustering
graphify extract ./docs --timing               # print per-stage wall-clock timings to stderr (also works on cluster-only)
graphify extract ./docs --force                # overwrite graph.json even if new graph has fewer nodes (use after refactors or to clear ghost duplicates)
graphify extract ./docs --dedup-llm            # LLM tiebreaker for ambiguous entity pairs (uses same API key)
graphify extract ./src --no-dedup              # skip entity dedup; on an incremental merge this also arms the shrink guard that refuses to drop untouched files' nodes
graphify extract ./docs --global --as myrepo   # extract and register into the cross-project global graph
GRAPHIFY_MAX_OUTPUT_TOKENS=32768 graphify extract ./docs --backend claude  # raise output cap for dense corpora

graphify export callflow-html                       # graphify-out/<project>-callflow.html
graphify export callflow-html --max-sections 8      # cap generated architecture sections
graphify export callflow-html --output docs/arch.html
graphify export callflow-html ./some-repo/graphify-out

graphify global add graphify-out/graph.json --as myrepo   # register a project graph into ~/.graphify/global-graph.json
graphify global remove myrepo                         # remove a project from the global graph
graphify global list                                  # show all registered repos + node/edge counts
graphify global path                                  # print path to the global graph file

graphify prs                              # PR dashboard: CI, review, worktree, graph impact
graphify prs 42                           # deep dive on PR #42
graphify prs --triage                     # AI triage ranking (auto-detects backend from env)
graphify prs --worktrees                  # worktree → branch → PR mapping
graphify prs --conflicts                  # PRs sharing graph communities (merge-order risk)
graphify prs --base main                  # filter to PRs targeting a specific base branch
graphify prs --repo owner/repo            # run against a different GitHub repo
GRAPHIFY_TRIAGE_BACKEND=kimi graphify prs --triage   # use a specific backend for triage

graphify clone https://github.com/karpathy/nanoGPT
graphify merge-graphs a.json b.json --out merged.json
graphify --version                                    # print installed version
graphify watch ./src
graphify check-update ./src
graphify update ./src
graphify update ./src --no-cluster  # skip reclustering, write raw AST graph only
graphify update ./src --force       # overwrite even if new graph has fewer nodes
graphify cluster-only ./my-project
graphify cluster-only ./my-project --graph path/to/graph.json  # custom graph location
graphify cluster-only ./my-project --max-concurrency 16 --batch-size 200  # parallel community labeling (large graphs)
graphify cluster-only ./my-project --resolution 1.5            # more, smaller communities
graphify cluster-only ./my-project --exclude-hubs 99           # exclude p99 degree nodes from partitioning
graphify cluster-only ./my-project --no-label                  # keep "Community N" placeholders
graphify cluster-only ./my-project --backend=gemini            # backend for community naming
graphify cluster-only ./my-project --backend=gemini --model gemini-2.5-pro  # specific model
graphify label ./my-project                                    # (re)name communities with the configured backend
graphify label ./my-project --backend=openai --model gpt-4o   # force a specific backend and model
Community names: inside an agent (Claude Code, Gemini CLI) the agent names communities itself. When you run the bare CLI, cluster-only auto-names them with the configured backend (built-in or custom OpenAI-compatible provider) — pass --no-label to keep Community N, or run graphify label to (re)generate names on demand.
Learn more
- How it works — the extraction pipeline, community detection, confidence scoring, benchmarks
- ARCHITECTURE.md — module breakdown, how to add a language
- Optional integrations — Docker MCP Toolkit + SQLite
- The Memory Layer — the book on the ideas behind graphify, the architecture end to end
graphify Enterprise
graphify Enterprise is the always-on layer built on top of graphify — it applies the same graph approach to your entire working context: meetings, files, docs, and code, updating continuously in the background.
Built for people and teams whose work lives across hundreds of conversations and documents they can never fully reconstruct.
Join the waitlist at graphify.com. Free trial launching soon.
Development setup
The project uses uv for dev workflow. Install it once, then:
git clone https://github.com/safishamsi/graphify.git
cd graphify
git checkout v8                        # active development branch

# Create the project venv and install graphify + all extras + the dev group
# (pytest). uv installs the dev dependency group by default; pass --no-dev to
# skip it.
uv sync --all-extras
Verify the editable install:
uv run graphify --version
uv run python -c "import graphify; print(graphify.__file__)"
Running tests
uv run pytest tests/ -q                # run the full suite
uv run pytest tests/test_extract.py -q # one module
uv run pytest tests/ -q -k "python"    # filter by name
CI parity checks
The authoritative CI commands live in .github/workflows/.
For local CI-style verification, use Python 3.10, 3.12, 3.13, or 3.14 and run:
uv sync --all-extras --frozen
uv run --frozen pytest tests/ -q --tb=short
uv run --frozen python -m tools.skillgen --check
uv run --frozen python -m tools.skillgen --audit-coverage
uv run --frozen python -m tools.skillgen --schema-singleton
uv run --frozen python -m tools.skillgen --monolith-roundtrip
uv run --frozen python -m tools.skillgen --always-on-roundtrip
uv run --frozen graphify --help
uv run --frozen graphify install
Ruff is useful as an additional local check (uv run --frozen ruff check .),
but is not currently a blocking CI job. Pyright is also local/advisory unless it
is added to CI later. The Bandit and pip-audit CI steps currently use
continue-on-error, so their findings are advisory rather than blocking.
macOS note: the test suite includes both sample.f90 and sample.F90 fixtures. These collide on case-insensitive HFS+ / APFS file systems. Run on Linux or in a Docker container if you need to test both Fortran variants simultaneously.
Windows note: the native Windows test suite exercises symbolic links, long
paths, POSIX permissions, path separators, and UTF-8 filesystem behavior.
Enable Windows Developer Mode to allow unprivileged symbolic-link creation, or
run the tests from an elevated shell. Enable the Windows LongPathsEnabled
policy before relying on long-path tests. Restart affected shells or applications
after changing either setting. For exact parity with the blocking GitHub Actions
test matrix, run the suite in WSL or Linux; CI currently runs on Ubuntu with
Python 3.10, 3.12, 3.13, and 3.14. Pyright is available as a local advisory check, but it is
not currently a blocking CI job.
Git workflow
- Active development happens on the
v8branch. - Commit style:
fix: <description>/feat: <description>/docs: <description> - Before opening a PR, run
uv run pytest tests/ -qand confirm it passes. - Add a fixture file to
tests/fixtures/and tests totests/test_languages.pyfor any new language extractor.
What to contribute
Worked examples are the most useful contribution. Run /graphify on a real corpus, save the output to worked/{slug}/, write an honest review.md covering what the graph got right and wrong, and open a PR.
Extraction bugs — open an issue with the input file, the cache entry (graphify-out/cache/), and what was missed or wrong.
See ARCHITECTURE.md for module responsibilities and how to add a language.
Community and links



