
GetNotes Tools
ahujasid/blender-mcp
Tool นี้คืออะไร
MCP for Blender เป็นเครื่องมือที่เชื่อมต่อ Blender เข้ากับ LLM (Large Language Model) ใดก็ได้ ช่วยให้นักพัฒนาและศิลปิน 3D สามารถสร้างและจัดการโมเดล 3D และฉากต่างๆ ใน Blender ได้อย่างรวดเร็วและง่ายดายด้วยการใช้คำสั่งจาก AI
ข้อมูลโปรเจกต์
ดาว
28.7K
Forks
2.6K
License
MIT
อัปเดต GitHub ล่าสุด
16 ก.ย. 2569
เพิ่มใน GetNotes
16 ก.ย. 2569
Repository
ahujasid/mcp-for-blender
เหมาะกับงาน
Ecosystem
Python
แปลและเรียบเรียงโดย AI
เนื้อหาฉบับภาษาไทย
ใช้อ่านเพื่อทำความเข้าใจเบื้องต้น โปรดตรวจสอบรายละเอียดสำคัญกับเอกสารต้นฉบับด้านล่าง
โดยมีประโยชน์ในการสร้างโมเดล 3D, การสร้างฉาก, และการจัดการวัตถุด้วย AI ผ่านการป้อนคำสั่ง
MCP for Blender
เชื่อมต่อ Blender กับ LLM ใดก็ได้
เดิมชื่อ blender-mcp — ตอนนี้แพ็กเกจ PyPI คือ mcp-for-blender
การตั้งค่าเดิมยังคงใช้งานได้ ไม่จำเป็นต้องเปลี่ยนการกำหนดค่าใดๆ อ่านเพิ่มเติม
ข้อจำกัดความรับผิดชอบ: นี่คือการผสานรวมจากบุคคลที่สามและไม่ได้สร้างโดย Blender
การสร้างโมเดล 3D, การสร้างฉาก, และการจัดการวัตถุด้วยความช่วยเหลือจากคำสั่ง — ขับเคลื่อนโดย AI


เว็บไซต์ · บทช่วยสอนฉบับเต็ม · Discord · สนับสนุน · ซื้อกาแฟให้ฉัน · ข้อเสนอแนะ
ผู้สนับสนุน
CodeRabbit Kevin Guanche Darias Guillermo Rauch
ผู้สนับสนุนทั้งหมด: สนับสนุนโปรเจกต์นี้
เริ่มต้นใช้งานอย่างรวดเร็ว
หมายเหตุ: แพ็กเกจ PyPI blender-mcp ตอนนี้คือ mcp-for-blender การตั้งค่าเดิมยังคงใช้งานได้ — uvx blender-mcp ยังคงรันเซิร์ฟเวอร์และ ไม่จำเป็นต้องเปลี่ยนการกำหนดค่าใดๆ การติดตั้งใหม่ควรใช้ mcp-for-blender
มีการเปลี่ยนแปลงอะไรและทำไม
สามขั้นตอน: ติดตั้ง uv, ชี้ไคลเอนต์ MCP ของคุณไปที่เซิร์ฟเวอร์, ติดตั้งส่วนเสริม Blender
1. ติดตั้ง uv
# macOS
brew install uv

# Linux
curl -LsSf https://astral.sh/uv/install.sh | sh

# Windows
powershell -c "irm https://astral.sh/uv/install.ps1 | iex"
คำเตือน: อย่าดำเนินการต่อก่อนที่จะติดตั้ง uv ใช้ตัวติดตั้งอย่างเป็นทางการ — ไม่ใช่ pip install uv
2. เพิ่มเซิร์ฟเวอร์ MCP ไปยังไคลเอนต์ของคุณ
{
    "mcpServers": {
        "blender": {
            "command": "uvx",
            "args": ["mcp-for-blender"]
        }
    }
}claude mcp add blender uvx mcp-for-blendercodex mcp add blender -- uvx mcp-for-blenderดู การตั้งค่าไคลเอนต์ MCP ด้านล่างสำหรับคำแนะนำเฉพาะไคลเอนต์และปุ่มติดตั้งในคลิกเดียว
3. ติดตั้งส่วนเสริม Blender
uvx mcp-for-blender install-addonจากนั้นใน Blender: Edit → Preferences → Add-ons → เปิดใช้งาน Interface: MCP for Blender
4. เชื่อมต่อ
ใน 3D viewport ของ Blender ให้กด N → เปิดแท็บ MCP for Blender → คลิก Start MCP Server แค่นั้นเอง — ขอให้ Claude สร้างอะไรบางอย่าง
หมายเหตุ: รันเซิร์ฟเวอร์ MCP เพียง หนึ่ง อินสแตนซ์เท่านั้น (ไม่ว่าจะเป็น Cursor หรือ Claude Desktop) ไม่ใช่ทั้งสองอย่าง
สารบัญ
- เริ่มต้นใช้งานอย่างรวดเร็ว
- คุณสมบัติ
- ส่วนประกอบ
- การติดตั้ง- [ข้อกำหนดเบื้องต้น](#prerequisites) - [ทำให้ไคลเอนต์ของคุณค้นหา uvx ได้](#make-your-client-find-uvx) - [ตรึงเวอร์ชัน Python](#pin-the-python-version) - [ติดตั้งโดยไม่ใช้ uv](#install-without-uv) - [รันด้วย Docker](#run-with-docker) - [ตัวแปรสภาพแวดล้อม](#environment-variables)
- การตั้งค่าไคลเอนต์ MCP- [Claude for Desktop](#claude-for-desktop) - [Codex](#codex) - [Cursor](#cursor) - [Visual Studio Code](#visual-studio-code) - [OpenCode](#opencode) - [Antigravity](#antigravity)
- การติดตั้งส่วนเสริม Blender
- การอัปเกรด (ผู้ใช้เดิม)
- การใช้งาน- [การเริ่มต้นการเชื่อมต่อ](#starting-the-connection) - [การใช้งานกับ Claude](#using-with-claude) - [ความสามารถ](#capabilities) - [คำสั่งตัวอย่าง](#example-commands)
- ข้อมูลรับรอง API แบบถาวร
- การแก้ไขปัญหา
- รายละเอียดทางเทคนิค
- ข้อจำกัดและข้อควรพิจารณาด้านความปลอดภัย
- การควบคุม Telemetry
- ข้อเสนอแนะ
- การมีส่วนร่วม
- ข้อจำกัดความรับผิดชอบ
- ประวัติ Star
คุณสมบัติ
| การสื่อสารสองทาง | เชื่อมต่อ Claude AI กับ Blender ผ่านเซิร์ฟเวอร์แบบ socket |
| การจัดการวัตถุ | สร้าง, แก้ไข, และลบวัตถุ 3D ใน Blender |
| การควบคุมวัสดุ | ใช้และแก้ไขวัสดุและสี |
| การตรวจสอบฉาก | รับข้อมูลโดยละเอียดเกี่ยวกับฉาก Blender ปัจจุบัน |
| การรันโค้ด | รันโค้ด Python ตามอำเภอใจใน Blender จาก Claude |
| การสร้าง Asset และโมเดล | Asset จาก Poly Haven, โมเดลจาก Sketchfab, โมเดล low-poly จาก Poly Pizza, และโมเดล 3D ที่สร้างโดย AI ผ่าน Hyper3D Rodin และ Hunyuan3D |
ส่วนประกอบ
ระบบประกอบด้วยส่วนประกอบหลักสองส่วน:
- 1ส่วนเสริม Blender (
addon.py) — ส่วนเสริม Blender ที่สร้างเซิร์ฟเวอร์ socket ภายใน Blender เพื่อรับและรันคำสั่ง - 2เซิร์ฟเวอร์ MCP (
src/blender_mcp/server.py) — เซิร์ฟเวอร์ Python ที่ใช้ Model Context Protocol และเชื่อมต่อกับส่วนเสริม Blender
การติดตั้ง
ข้อกำหนดเบื้องต้น
- Blender 3.0 หรือใหม่กว่า
- Python 3.10 หรือใหม่กว่า
- ตัวจัดการแพ็กเกจ uv
macOS
brew install uvWindows
powershell -c "irm https://astral.sh/uv/install.ps1 | iex"จากนั้นเพิ่ม uv ไปยัง user path ใน Windows (คุณอาจต้องรีสตาร์ท Claude Desktop หลังจากนี้):
$localBin = "$env:USERPROFILE\.local\bin"
$userPath = [Environment]::GetEnvironmentVariable("Path", "User")
[Environment]::SetEnvironmentVariable("Path", "$userPath;$localBin", "User")
Linux
curl -LsSf https://astral.sh/uv/install.sh | shมันจะไปอยู่ใน ~/.local/bin — เปิดเชลล์ใหม่เพื่อให้มันอยู่ใน PATH ของคุณ
มิฉะนั้น คำแนะนำในการติดตั้งจะอยู่ในเว็บไซต์ของพวกเขา: ติดตั้ง uv
ในทุก OS ให้ใช้ ตัวติดตั้งอย่างเป็นทางการของ uv ด้านบน — ไม่ใช่ pip install uv ซึ่งอาจไม่สร้างคำสั่ง uvx และสามารถซ่อน uv ไว้ในสภาพแวดล้อมที่ไคลเอนต์ของคุณมองไม่เห็น
คำเตือน: อย่าดำเนินการต่อก่อนที่จะติดตั้ง uv
ทำให้ไคลเอนต์ของคุณค้นหา uvx ได้
ไคลเอนต์ MCP ที่เริ่มต้นจาก GUI (Claude Desktop, Cursor, VS Code จาก Dock/Start menu) ไม่ ได้รับ PATH ของเทอร์มินัลของคุณ ดังนั้น "command": "uvx" เปล่าๆ อาจล้มเหลวด้วย spawn uvx ENOENT แม้ว่า uvx จะทำงานในเทอร์มินัลของคุณก็ตาม หากเกิดเหตุการณ์เช่นนั้น:
- ค้นหาพาธเต็มของ uvx —
which uvx(macOS/Linux) หรือwhere uvx(Windows) — และใช้เป็น"command"เช่น/opt/homebrew/bin/uvxหรือC:\Users\<you>\.local\bin\uvx.exe - บน Windows คุณสามารถห่อหุ้มมันได้แทน:
"command": "cmd", "args": ["/c", "uvx", "mcp-for-blender"] - หลังจากการเปลี่ยนแปลง PATH หรือการกำหนดค่าใดๆ ให้ปิดและเปิดไคลเอนต์ใหม่ทั้งหมด (Windows: ออกจาก system tray ไม่ใช่แค่หน้าต่าง; macOS: Cmd+Q)
ตรึงเวอร์ชัน Python
หลีกเลี่ยงความขัดแย้งของ conda / pyenv / เวอร์ชัน
uv จะเลือก Python ที่รันเซิร์ฟเวอร์ บนเครื่องที่มี conda (base ที่เปิดใช้งานอัตโนมัติ), pyenv, หรือ asdf — หรือด้วย CPython เวอร์ชันใหม่กว่าที่บาง dependencies ยังไม่มี wheels ให้ — uv สามารถเลือก interpreter ที่ทำให้การติดตั้งล้มเหลวได้ ตรึง Python 3.11 และเลือกใช้ interpreter ที่จัดการโดย uv เพื่อหลีกเลี่ยงการใช้สิ่งใดก็ตามที่อยู่ใน PATH ของคุณ:
{
    "mcpServers": {
        "blender": {
            "command": "uvx",
            "args": ["--python", "3.11", "mcp-for-blender"],
            "env": { "UV_PYTHON_PREFERENCE": "only-managed" }
        }
    }
}
--python 3.11 ยังคงเป็นไปตาม requires-python >=3.10 ของแพ็กเกจนี้ และ UV_PYTHON_PREFERENCE=only-managed จะป้องกันไม่ให้ uv เลือก conda, pyenv, asdf, หรือ system Python ก่อน (ไฟล์ .python-version ของ repo เป็นเพียงคำแนะนำสำหรับผู้มีส่วนร่วมและ ไม่ มีผลต่อ uvx)
หากความพยายามที่ล้มเหลวก่อนหน้านี้ยังคงเกิดขึ้นซ้ำหลังจากแก้ไขแล้ว ให้ล้างแคช:
uv cache clean mcp-for-blender blender-mcp && uvx --refresh mcp-for-blenderติดตั้งโดยไม่ใช้ uv
บนเครื่องที่ถูกล็อก คุณสามารถข้าม uvx ไปได้เลยด้วย pipx จากนั้นชี้ไคลเอนต์ของคุณไปยังคำสั่งที่ติดตั้งไว้:
pipx install mcp-for-blender
pipx ensurepath          # จากนั้นรีสตาร์ทเชลล์ / ไคลเอนต์ของคุณ
ใช้พาธสัมบูรณ์ที่ได้เป็น "command" (ค้นหาได้ด้วย which mcp-for-blender / where mcp-for-blender) และละเว้น args
รันด้วย Docker
คุณสามารถรันเซิร์ฟเวอร์ MCP ในคอนเทนเนอร์แทนการติดตั้งได้ Blender เองยังคงรันบนเครื่องของคุณ — คอนเทนเนอร์เป็นเพียงโฮสต์เซิร์ฟเวอร์ MCP ซึ่งจะเชื่อมต่อไปยังแอดออนของ Blender
สร้างอิมเมจจาก root ของ repo:
docker build -t mcp-for-blender .จากนั้นชี้ไคลเอนต์ MCP ของคุณไปที่มัน (ต้องใช้แฟล็ก -i — เซิร์ฟเวอร์สื่อสารกับไคลเอนต์ผ่าน stdin/stdout):
{
    "mcpServers": {
        "blender": {
            "command": "docker",
            "args": ["run", "-i", "--rm", "mcp-for-blender"]
        }
    }
}
อิมเมจจะตั้งค่าเริ่มต้นเป็น BLENDER_HOST=host.docker.internal ซึ่งจะเชื่อมต่อกับ Blender ของโฮสต์ได้ทันทีด้วย Docker Desktop บน macOS และ Windows
บน Linux, host.docker.internal ไม่มีอยู่จริงและแอดออนจะฟังเฉพาะ localhost ดังนั้นให้ใช้ host networking แทน:
{
    "mcpServers": {
        "blender": {
            "command": "docker",
            "args": ["run", "-i", "--rm", "--network=host", "-e", "BLENDER_HOST=localhost", "mcp-for-blender"]
        }
    }
}
หากต้องการเปิดใช้งาน safe mode ในคอนเทนเนอร์ ให้เพิ่ม "-e", "BLENDER_MCP_SAFE_MODE=1" ลงใน args
ตัวแปรสภาพแวดล้อม
สามารถใช้ตัวแปรสภาพแวดล้อมต่อไปนี้เพื่อกำหนดค่าการเชื่อมต่อ Blender:
| ตัวแปร | ค่าเริ่มต้น | คำอธิบาย |
|---|---|---|
BLENDER_HOST | localhost | ที่อยู่โฮสต์สำหรับ Blender socket server |
BLENDER_PORT | 9876 | หมายเลขพอร์ตสำหรับ Blender socket server |
BLENDER_MCP_SAFE_MODE | ปิด | ตั้งค่าเป็น 1 เพื่อตรวจสอบสคริปต์ก่อนที่จะรันใน Blender (ดูด้านล่าง) |
ตัวอย่าง:
export BLENDER_HOST='host.docker.internal'
export BLENDER_PORT=9876
คุณยังสามารถส่งการเชื่อมต่อเป็นแฟล็ก CLI ซึ่งจะมีลำดับความสำคัญเหนือตัวแปรสภาพแวดล้อม สิ่งนี้มีประโยชน์สำหรับการรัน Blender หลายอินสแตนซ์พร้อมกัน เนื่องจากแต่ละรายการไคลเอนต์ MCP สามารถชี้ไปยังพอร์ตที่แตกต่างกันด้วยอาร์กิวเมนต์ธรรมดาแทนตัวแปรสภาพแวดล้อม:
uvx mcp-for-blender --port 9877ในการกำหนดค่าไคลเอนต์ MCP นั่นหมายถึงรายการที่สองที่แตกต่างกันเฉพาะใน args:
{
  "mcpServers": {
    "blender": { "command": "uvx", "args": ["mcp-for-blender"] },
    "blender-b": { "command": "uvx", "args": ["mcp-for-blender", "--port", "9877"] }
  }
}
แต่ละอินสแตนซ์ต้องมีพอร์ตของตัวเองที่ตั้งค่าไว้ในแผงแอดออนของ Blender ให้ตรงกัน
หมายเหตุ: เซิร์ฟเวอร์ซ็อกเก็ตของแอดออนไม่มีการตรวจสอบสิทธิ์หรือการเข้ารหัส ดังนั้นใครก็ตามที่สามารถเข้าถึงพอร์ตนั้นสามารถรัน Python ภายใน Blender ได้ เก็บไว้ที่ localhost เว้นแต่คุณจะอยู่ในเครือข่ายที่เชื่อถือได้ และควรใช้อุโมงค์ SSH มากกว่าการชี้ --host/BLENDER_HOST ไปยังเครื่องระยะไกลโดยตรง
Safe mode
โดยค่าเริ่มต้น AI สามารถรันโค้ด Python ใดก็ได้ใน Blender ตั้งค่า BLENDER_MCP_SAFE_MODE=1 เพื่อตรวจสอบทุกสคริปต์ก่อนที่จะรันและบล็อกโค้ดที่มีความเสี่ยง — เช่น การอ่านหรือเขียนไฟล์โดยตรง, การรันโปรแกรมอื่น, การเข้าถึงเครือข่าย, หรือการติดตั้งโค้ดที่ยังคงรันอยู่หลังจากสคริปต์สิ้นสุดลง การทำงานปกติของ Blender (การสร้างโมเดล, วัสดุ, การเรนเดอร์, การบันทึก, การนำเข้า/ส่งออก) ยังคงทำงานได้ สคริปต์ที่ถูกบล็อกจะถูกส่งกลับไปยัง AI พร้อมเหตุผล เพื่อให้ AI สามารถลองอีกครั้งด้วยเวอร์ชันที่แก้ไขแล้ว
การตั้งค่าไคลเอนต์ MCP
Claude for Desktop
ดูวิดีโอคำแนะนำการตั้งค่า (สมมติว่าคุณได้ติดตั้ง uv แล้ว)
ไปที่ Claude → Settings → Developer → Edit Config → claude_desktop_config.json และเพิ่มสิ่งต่อไปนี้:
{
    "mcpServers": {
        "blender": {
            "command": "uvx",
            "args": [
                "mcp-for-blender"
            ]
        }
    }
}
ใช้ Claude Code CLI เพื่อเพิ่มเซิร์ฟเวอร์ MCP for Blender:
claude mcp add blender uvx mcp-for-blenderCodex
Codex CLI, แอปเดสก์ท็อป และส่วนขยาย IDE ทั้งหมดใช้ไฟล์คอนฟิกเดียวกัน (~/.codex/config.toml) ดังนั้นการตั้งค่าเซิร์ฟเวอร์เพียงครั้งเดียวจะครอบคลุมทั้งสามอย่าง
ลงทะเบียนเซิร์ฟเวอร์ด้วย Codex CLI:
codex mcp add blender -- uvx mcp-for-blenderหรือเพิ่มด้วยตนเองลงใน ~/.codex/config.toml (หรือ $CODEX_HOME/config.toml):
[mcp_servers.blender]
command = "uvx"
args = ["mcp-for-blender"]
หรือใน Codex desktop app: Settings → MCP servers → Add server → ตั้งชื่อว่า blender, เลือก STDIO, ป้อน uvx mcp-for-blender เป็นคำสั่ง, จากนั้น Save และรีสตาร์ท หากแอปไม่พบ uvx ให้ใช้พาธเต็มแทน — ดู Make your client find uvx
ตรวจสอบว่าลงทะเบียนแล้วด้วย codex mcp list — เซิร์ฟเวอร์ blender ควรแสดงเป็น enabled เครื่องมือจะพร้อมใช้งานในครั้งถัดไปที่คุณเริ่ม Codex
หากต้องการตั้งค่า environment variables (เช่น โฮสต์/พอร์ต Blender ที่ไม่ใช่ค่าเริ่มต้น) ให้ส่งแฟล็ก --env KEY=VALUE ไปยัง codex mcp add หรือเพิ่มลงในไฟล์คอนฟิก:
[mcp_servers.blender]
command = "uvx"
args = ["mcp-for-blender"]
env = { BLENDER_HOST = "localhost", BLENDER_PORT = "9876" }
Cursor

macOS — ไปที่ Settings → MCP และวางสิ่งต่อไปนี้:
- หากต้องการใช้เป็นเซิร์ฟเวอร์ส่วนกลาง ให้ใช้ปุ่ม "add new global MCP server" และวาง
- หากต้องการใช้เป็นเซิร์ฟเวอร์เฉพาะโปรเจกต์ ให้สร้าง
.cursor/mcp.jsonใน root ของโปรเจกต์และวาง
{
    "mcpServers": {
        "blender": {
            "command": "uvx",
            "args": [
                "mcp-for-blender"
            ]
        }
    }
}
Windows — ไปที่ Settings → MCP → Add Server, เพิ่มเซิร์ฟเวอร์ใหม่ด้วยการตั้งค่าต่อไปนี้:
{
    "mcpServers": {
        "blender": {
            "command": "cmd",
            "args": [
                "/c",
                "uvx",
                "mcp-for-blender"
            ]
        }
    }
}หมายเหตุ: รันเซิร์ฟเวอร์ MCP เพียง หนึ่ง อินสแตนซ์เท่านั้น (ไม่ว่าจะบน Cursor หรือ Claude Desktop) ไม่ใช่ทั้งสองอย่าง
Visual Studio Code
ข้อกำหนดเบื้องต้น: ตรวจสอบให้แน่ใจว่าคุณได้ติดตั้ง Visual Studio Code ก่อนดำเนินการต่อ

OpenCode
{
  "mcp": {
    "blender-mcp": {
      "type": "local",
      "command": ["uvx", "mcp-for-blender"],
      "enabled": true,
      "environment": {
        "BLENDER_HOST": "localhost",
        "BLENDER_PORT": "9876"
      }
    }
  }
}
Antigravity
{
  "mcpServers": {
    "blender-mcp": {
      "command": "uvx",
      "args": ["mcp-for-blender"],
      "env": {
        "BLENDER_HOST": "localhost",
        "BLENDER_PORT": "9876"
      }
    }
  }
}
การติดตั้ง Blender Addon
1. แนะนำ — จากเทอร์มินัล รัน:
uvx mcp-for-blender install-addonคำสั่งนี้จะคัดลอกแอดออนไปยังโฟลเดอร์แอดออนของ Blender ของคุณในชื่อ blender_mcp.py มันจะพิมพ์ตำแหน่งที่เขียนถึง และเก็บไฟล์ .bak ของไฟล์ใดๆ ที่ถูกแทนที่
ทางเลือก: uvx mcp-for-blender addon-paths จะแสดงรายการโฟลเดอร์แอดออนของ Blender ที่ตรวจพบ คุณสามารถกำหนดปลายทางใหม่ได้ด้วย BLENDERMCP_ADDONS_DIR=/path/to/scripts/addons
2. เปิด Blender
3. ไปที่ Edit → Preferences → Add-ons
4. เปิดใช้งาน Interface: MCP for Blender (ค้นหา "MCP for Blender") หากยังไม่ปรากฏ ให้คลิก Install… และเลือก blender_mcp.py / addon.py ที่คัดลอกมา หรือรีสตาร์ท Blender
5. ทางเลือกแบบแมนนวล — หากคำสั่งด้านบนไม่พบการติดตั้ง Blender ของคุณ หรือคุณต้องการทำด้วยตนเอง: ดาวน์โหลด addon.py จาก repo นี้ → ใน Blender, Edit → Preferences → Add-ons → Install… → เลือก addon.py ที่ดาวน์โหลดมา → เปิดใช้งาน
จากนั้นเปิดแท็บ MCP for Blender ในแถบด้านข้างของ Blender (กด N ใน 3D viewport) และคลิก Start MCP Server ดู Starting the Connection ด้านล่าง
การอัปเกรด (สำหรับผู้ใช้เดิม)
สำหรับผู้ใช้ใหม่ ให้ไปที่ Quickstart โดยตรง สำหรับผู้ใช้เดิม โปรดดูด้านล่าง
1. อัปเดตไฟล์แอดออนโดยรัน:
uvx mcp-for-blender install-addon
uvx mcp-for-blender addon-paths   # ทางเลือก: แสดงรายการโฟลเดอร์แอดออนของ Blender ที่ตรวจพบ
2. ใน Blender: Preferences → Add-ons → ปิดใช้งานและเปิดใช้งาน Interface: MCP for Blender อีกครั้ง (หรือรีสตาร์ท Blender) จากนั้นคลิก Start MCP Server อีกครั้ง
3. ลบ MCP server ออกจาก Claude แล้วเพิ่มกลับเข้าไปใหม่ หากแพ็กเกจเซิร์ฟเวอร์จำเป็นต้องรีเฟรช
หมายเหตุ: MCP server จะไม่แก้ไขไฟล์ Blender addon ของคุณเอง เมื่อมันเริ่มทำงาน มันจะตรวจสอบว่า addon ที่ติดตั้งนั้นล้าหลังกว่าสำเนาที่มาพร้อมกับแพ็กเกจหรือไม่ และจะบันทึกวิธีการอัปเดตไว้; install-addon คือสิ่งที่เขียนไฟล์จริง ๆ และมันจะเก็บสำเนา .bak ของไฟล์ที่ถูกแทนที่ไว้ การจับภาพ Trajectory ยังคงทำงานบน addons เก่าที่โหลดไว้ผ่านกลไกสำรอง execute_code
การใช้งาน
การเริ่มต้นการเชื่อมต่อ
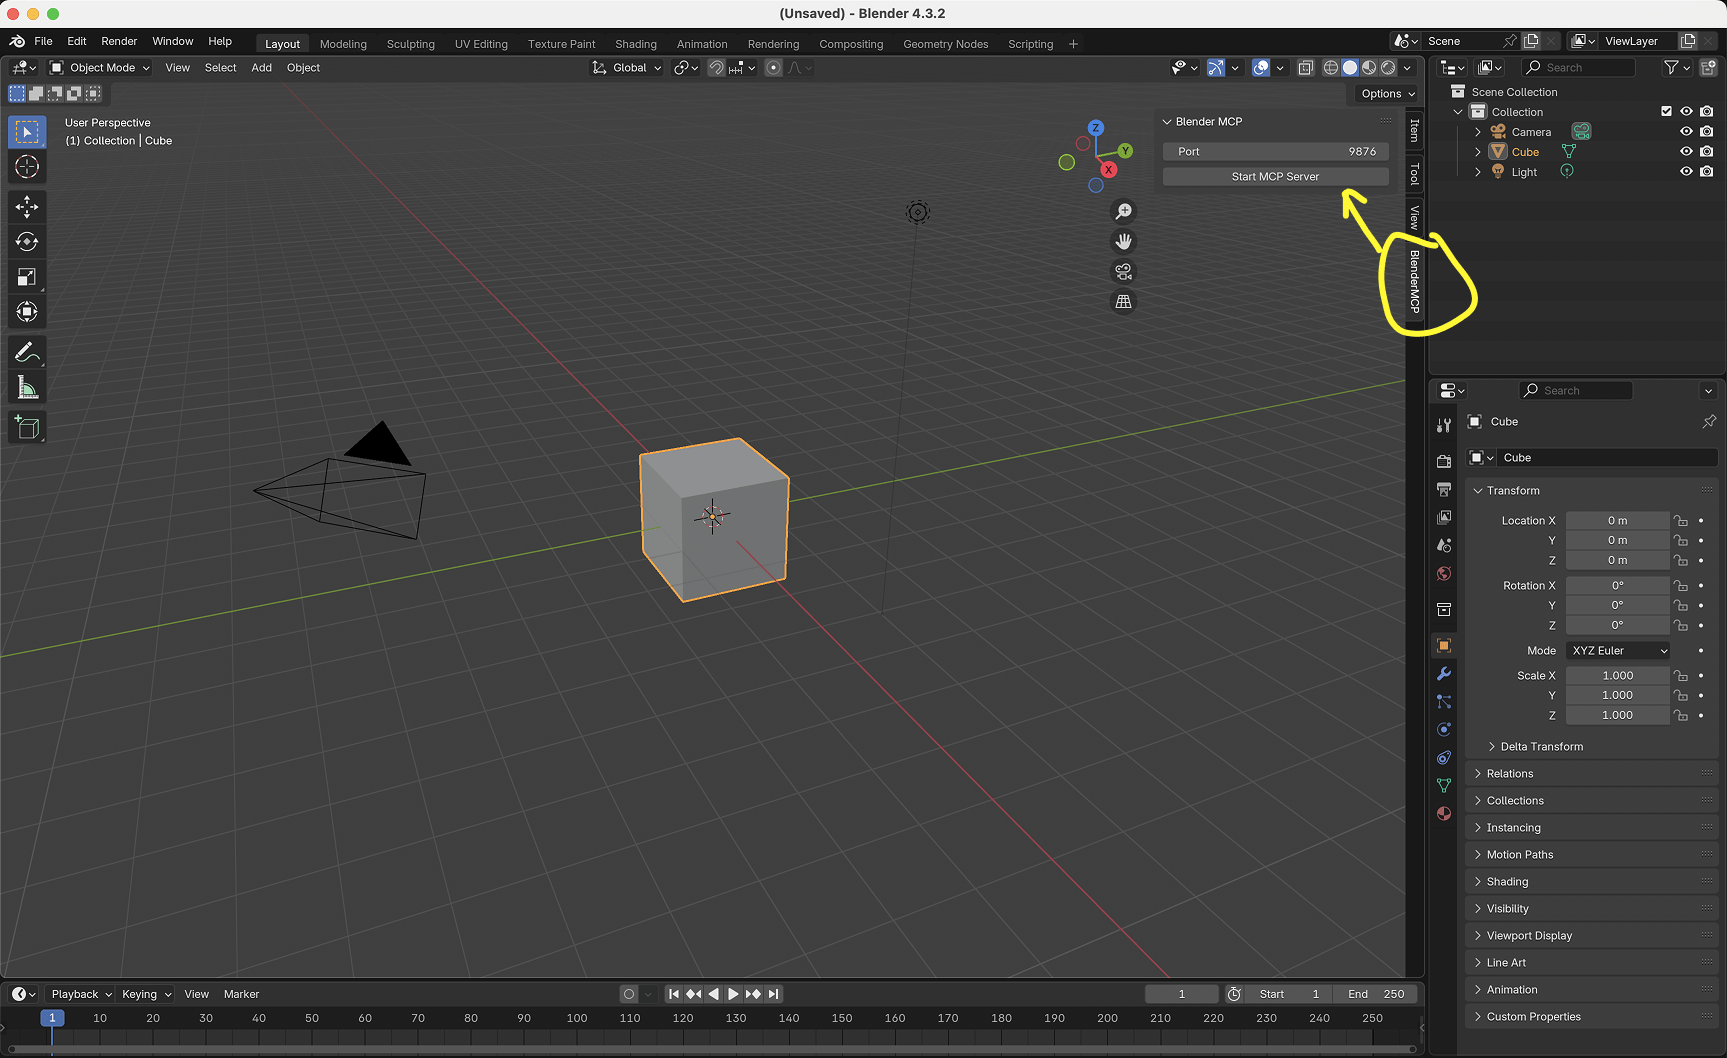
- 1ใน Blender ไปที่แถบด้านข้าง 3D View (กด N หากไม่เห็น)
- 2ค้นหาแท็บ MCP for Blender
- 3เปิดใช้งานช่องทำเครื่องหมายที่คุณต้องการใช้ (ดูเพิ่มเติมภายใต้ ความสามารถ ด้านล่าง)
- 4คลิก Connect to Claude
- 5ตรวจสอบให้แน่ใจว่า MCP server กำลังทำงานอยู่ในเทอร์มินัลของคุณ
การใช้งานกับ Claude
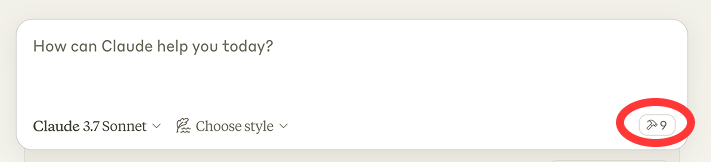
เมื่อไฟล์คอนฟิกถูกตั้งค่าบน Claude และ addon กำลังทำงานบน Blender คุณจะเห็นไอคอนรูปค้อนพร้อมเครื่องมือสำหรับ MCP for Blender
ความสามารถ
- รับข้อมูลฉากและวัตถุ
- สร้าง, ลบ และแก้ไขรูปร่าง
- ใช้หรือสร้างวัสดุสำหรับวัตถุ
- รันโค้ด Python ใด ๆ ใน Blender
- ส่งออกฉาก, ส่วนที่เลือก หรือวัตถุที่ระบุชื่อไปยัง GLB/FBX สำหรับแอปพลิเคชันอื่น ๆ (
export_scene) - ค้นหา node schemas และเอกสารอ้างอิง bpy API แทนที่จะต้องเดาลำดับ socket หรือชื่อ enum
- ดาวน์โหลดโมเดล, asset และ HDRI ที่ถูกต้องผ่าน Poly Haven
- ค้นหาและดาวน์โหลดโมเดลจาก Sketchfab
- ค้นหาและดาวน์โหลดโมเดล low-poly จาก Poly Pizza
- โมเดล 3D ที่สร้างโดย AI ผ่าน Hyper3D Rodin และ Hunyuan3D
Hunyuan3D บน Tencent Cloud (โหมด Official API)
บริการ Tencent Cloud ที่ addon ต้องเรียกใช้ขึ้นอยู่กับว่าบัญชีของคุณอยู่ที่ใด:
| บัญชี | บริการที่ addon เรียกใช้ | ภูมิภาค | สวิตช์แถบด้านข้าง |
|---|---|---|---|
| Mainland (cloud.tencent.com) | AI3D 3.0 (ai3d, เวอร์ชัน 2025-05-13) | ap-guangzhou | ปิด International (Pro) account ไว้ (ค่าเริ่มต้น) |
| International (tencentcloud.com), Hunyuan-to-3D (Professional) | hunyuan, เวอร์ชัน 2023-09-01, เปิดใช้งาน PBR | ap-singapore | ติ๊ก International (Pro) account |
ข้อมูลรับรองระหว่างประเทศที่ส่งไปยังปลายทางในจีนแผ่นดินใหญ่จะล้มเหลวด้วย AuthFailure.SignatureFailure หรือ ResourceUnavailable ดังนั้นให้ติ๊กสวิตช์เมื่อ SecretId/SecretKey ของคุณมาจาก tencentcloud.com สวิตช์นี้อยู่ภายใต้ Tencent Hunyuan 3D → Official API ในแถบด้านข้าง
Poly Pizza
Poly Pizza เป็นแหล่งรวมโมเดล low-poly ฟรีประมาณ 10,600 รายการ รวมถึงคลัง Google Poly ที่ได้รับการกู้คืนมา เป็นแหล่งที่ดีที่สุดสำหรับ asset เกมที่มีสไตล์: ทุกโมเดลเป็นไฟล์ .glb ที่สมบูรณ์ในตัวเอง และรูปทรงเรขาคณิตเบากว่าของ Sketchfab มาก
- 1รับ API key ฟรีที่ poly.pizza/settings/api
- 2ในแถบด้านข้าง 3D View ให้ติ๊ก Use assets from Poly Pizza
- 3วาง key ลงในช่อง API Key ที่ปรากฏขึ้น (หรือเก็บไว้ถาวรภายใต้ Edit → Preferences → Add-ons → MCP for Blender)
ตัวอย่างการทำงาน:
"ค้นหา Poly Pizza สำหรับเก้าอี้ low-poly ภายใต้ใบอนุญาต CC0 และนำเข้าหนึ่งตัวที่มีความสูง 1 เมตร"
Claude จะเรียก search_polypizza_models(query="chair", licence="CC0") ซึ่งจะส่งคืนแต่ละรายการที่ตรงกันพร้อมใบอนุญาตและจำนวนสามเหลี่ยม จากนั้นเรียก download_polypizza_model(model_id="...", normalize_size=True, target_size=1.0)
คุณยังสามารถกรองตามหมวดหมู่ ("Animals", "Furniture & Decor", "Transport", "Nature", "Buildings", "People & Characters", "Food & Drink", "Weapons", "Clutter", "Objects", "Scenes & Levels", "Other") หรือขอเฉพาะโมเดลที่มีแอนิเมชันเท่านั้น
การระบุแหล่งที่มา: ประมาณ 69% ของแคตตาล็อก Poly Pizza เป็น CC-BY ซึ่ง กำหนดให้ คุณต้องให้เครดิตผู้สร้างทุกที่ที่โมเดลปรากฏ เมื่อนำเข้า บรรทัดเครดิตที่จัดรูปแบบพร้อมแล้วจะถูกเขียนลงบนวัตถุหลักที่นำเข้าแต่ละชิ้นเป็นคุณสมบัติที่กำหนดเอง polypizza_attribution (พร้อมกับ polypizza_id และ polypizza_licence) ดังนั้นจึงถูกบันทึกไว้ใน .blend ของคุณและคงอยู่ตลอดเซสชัน กรองด้วย licence="CC0" หากคุณต้องการใช้โมเดลที่ไม่ต้องให้เครดิต
ตัวอย่างคำสั่ง
นี่คือตัวอย่างสิ่งที่คุณสามารถขอให้ Claude ทำได้:
| ข้อความแจ้ง | ตัวอย่าง |
|---|---|
| "สร้างฉาก low poly ในดันเจี้ยน โดยมีมังกรเฝ้าหม้อทองคำ" | ดู |
| "สร้างบรรยากาศชายหาดโดยใช้ HDRIs, textures และโมเดลเช่นหินและพืชพรรณจาก Poly Haven" | ดู |
| ให้ภาพอ้างอิง และสร้างฉาก Blender จากภาพนั้น | ดู |
| "รับข้อมูลเกี่ยวกับฉากปัจจุบัน และสร้าง threejs sketch จากมัน" | ดู |
| "สร้างโมเดล 3D ของตุ๊กตาโนมในสวนผ่าน Hyper3D" | |
| "เติมเฟอร์นิเจอร์ low-poly จาก Poly Pizza ให้เต็มห้องนี้" | |
| "ทำให้รถคันนี้เป็นสีแดงและเป็นโลหะ" | |
| "สร้างทรงกลมและวางไว้เหนือลูกบาศก์" | |
| "ทำให้แสงเหมือนสตูดิโอ" | |
| "หันกล้องไปที่ฉาก และทำให้เป็นแบบไอโซเมตริก" |
ข้อมูลรับรอง API แบบถาวร
MCP for Blender รองรับข้อมูลรับรองแบบถาวรผ่าน Blender Add-on Preferences:
Edit → Preferences → Add-ons → MCP for Blender
คุณสามารถเก็บค่าเหล่านี้ไว้ที่นั่นเพื่อให้คงอยู่แม้จะรีสตาร์ท Blender:
- Sketchfab API Key
- Poly Pizza API Key
- Hyper3D API Key
- Hunyuan3D SecretId / SecretKey
- Hunyuan3D API URL
สำหรับการตั้งค่าแบบ headless หรือ CI ข้อมูลรับรองยังสามารถถูกฉีดโดยตัวแปรสภาพแวดล้อม:
| ตัวแปร |
|---|
BLENDERMCP_SKETCHFAB_API_KEY |
BLENDERMCP_POLYPIZZA_API_KEY |
BLENDERMCP_HYPER3D_API_KEY |
BLENDERMCP_HUNYUAN3D_SECRET_ID |
BLENDERMCP_HUNYUAN3D_SECRET_KEY |
BLENDERMCP_HUNYUAN3D_API_URL |
การแก้ไขปัญหา
| ปัญหา | วิธีแก้ไข |
|---|---|
| ปัญหาการเชื่อมต่อ | ตรวจสอบให้แน่ใจว่า Blender addon server กำลังทำงานอยู่ และ MCP server ได้รับการกำหนดค่าบน Claude ห้าม รันคำสั่ง uvx ในเทอร์มินัล บางครั้งคำสั่งแรกอาจไม่ผ่าน แต่หลังจากนั้นจะเริ่มทำงาน |
| ข้อผิดพลาดหมดเวลา (Timeout errors) | ลองทำให้คำขอของคุณง่ายขึ้น หรือแบ่งเป็นขั้นตอนย่อย ๆ |
| การรวม Poly Haven | Claude บางครั้งก็ทำงานผิดปกติ |
| การดาวน์โหลด Poly Pizza ล้มเหลวเนื่องจาก Cloudflare challenge | static.poly.pizza อยู่เบื้องหลังการป้องกันบอทและบล็อก IP ของศูนย์ข้อมูล, VPN และคลาวด์ API key ของคุณใช้งานได้ดี - CDN ไม่เห็นมัน ลองใหม่จากการเชื่อมต่อปกติ หรือดาวน์โหลดไฟล์ .glb ด้วยตนเองแล้วใช้ File → Import → glTF 2.0 |
| คุณลองปิดแล้วเปิดใหม่หรือยัง? | หากคุณยังคงมีข้อผิดพลาดในการเชื่อมต่อ ลองรีสตาร์ททั้ง Claude และ Blender server |
รายละเอียดทางเทคนิค
โปรโตคอลการสื่อสาร
ระบบใช้โปรโตคอลแบบ JSON ง่าย ๆ ผ่าน TCP sockets:
- คำสั่ง ถูกส่งเป็นออบเจกต์ JSON ที่มี
typeและparamsที่เป็นทางเลือก - การตอบกลับ เป็นออบเจกต์ JSON ที่มี
statusและresultหรือmessage
ข้อจำกัดและข้อควรพิจารณาด้านความปลอดภัย
คำเตือน: เครื่องมือ execute_blender_code อนุญาตให้รันโค้ด Python ตามอำเภอใจใน Blender ซึ่งอาจมีประสิทธิภาพแต่ก็อาจเป็นอันตรายได้ ใช้ด้วยความระมัดระวังในสภาพแวดล้อมการผลิต บันทึกงานของคุณเสมอ ก่อนใช้งาน
- Poly Haven ต้องดาวน์โหลดโมเดล, textures และภาพ HDRI หากคุณไม่ต้องการใช้ โปรดปิดใช้งานในช่องทำเครื่องหมายใน Blender
- การดำเนินการที่ซับซ้อนอาจต้องแบ่งออกเป็นขั้นตอนย่อย ๆ
การควบคุม Telemetry
MCP for Blender รวบรวมข้อมูลการใช้งานที่ไม่ระบุตัวตนเพื่อช่วยปรับปรุงเครื่องมือ การยินยอม Telemetry เปิดใช้งานโดยค่าเริ่มต้น และคุณสามารถปิดได้สองวิธี:
1. ใน Blender — ไปที่ Edit → Preferences → Add-ons → MCP for Blender และยกเลิกการเลือกช่องทำเครื่องหมายการยินยอม telemetry
- ด้วยความยินยอม (เลือกไว้, ค่าเริ่มต้น): ดู TnC สำหรับรายละเอียดเพิ่มเติมเกี่ยวกับข้อมูลที่รวบรวม
2. ตัวแปรสภาพแวดล้อม — ปิดใช้งาน telemetry ทั้งหมดโดยสมบูรณ์โดยการรัน:
DISABLE_TELEMETRY=true uvx mcp-for-blenderหรือเพิ่มลงในคอนฟิก MCP ของคุณ:
{
    "mcpServers": {
        "blender": {
            "command": "uvx",
            "args": ["mcp-for-blender"],
            "env": {
                "DISABLE_TELEMETRY": "true"
            }
        }
    }
}
ข้อมูล Telemetry ไม่ได้เชื่อมโยงกับชื่อหรือบัญชีของคุณ อาจถูกใช้เพื่อปรับปรุง MCP for Blender, เพื่อการวิจัย และเพื่อฝึกโมเดล AI
รายละเอียดทั้งหมดเกี่ยวกับสิ่งที่ถูกรวบรวม และใบอนุญาตที่คุณให้โดยการเปิด telemetry ไว้ อยู่ใน TERMS_AND_CONDITIONS.md
ข้อเสนอแนะ
เรากำลังมองหาข้อเสนอแนะเกี่ยวกับ MCP for Blender อย่างกระตือรือร้น หากคุณมีความคิดเห็นใด ๆ โปรดแบ่งปัน ที่นี่
หากคุณมีข้อเสนอแนะที่ละเอียดกว่านี้ คุณสามารถกำหนดเวลาการโทรกับเรา ที่นี่ — เราจะให้เครดิตคุณในโครงการ
เข้าร่วมคอมมูนิตี้
ให้ข้อเสนอแนะ รับแรงบันดาลใจ และต่อยอด MCP ได้ที่: Discord
การมีส่วนร่วม
ยินดีรับการมีส่วนร่วม! โปรดส่ง Pull Request ได้เลย
ข้อจำกัดความรับผิดชอบ
นี่คือการผสานรวมจากบุคคลที่สามและไม่ได้สร้างโดย Blender สร้างโดย Siddharth
ประวัติการติดดาว
หาก MCP for Blender มีประโยชน์กับคุณ โปรดพิจารณากดติดดาวให้กับ repo นี้
เอกสารโปรเจกต์
อ่านเอกสารต้นฉบับ
README วิธีติดตั้ง วิธีใช้งาน และข้อกำหนดจาก repository ต้นฉบับ
MCP for Blender
Connect Blender to any LLM
formerly blender-mcp — the PyPI package is now mcp-for-blender.
Existing setups keep working; no config change is required. Read more
Disclaimer: This is a third-party integration and not made by Blender
Prompt-assisted 3D modeling, scene creation, and manipulation — driven by AI.
Website · Full Tutorial · Discord · Sponsor · Buy me a coffee · Feedback
Supporters
CodeRabbit Kevin Guanche Darias Guillermo Rauch
All supporters: Support this project
Quickstart
Note: the PyPI package blender-mcp is now mcp-for-blender. Existing setups
keep working — uvx blender-mcp still runs the server and no config change is
required. New installs should use mcp-for-blender.
What changed and why
Three steps: install uv, point your MCP client at the server, install the Blender addon.
1. Install uv
# macOS
brew install uv

# Linux
curl -LsSf https://astral.sh/uv/install.sh | sh

# Windows
powershell -c "irm https://astral.sh/uv/install.ps1 | iex"
Warning: Do not proceed before installing uv. Use the official installer — not pip install uv.
2. Add the MCP server to your client
{
    "mcpServers": {
        "blender": {
            "command": "uvx",
            "args": ["mcp-for-blender"]
        }
    }
}claude mcp add blender uvx mcp-for-blendercodex mcp add blender -- uvx mcp-for-blenderSee MCP Client Setup below for per-client instructions and one-click install buttons.
3. Install the Blender addon
uvx mcp-for-blender install-addonThen in Blender: Edit → Preferences → Add-ons → enable Interface: MCP for Blender.
4. Connect
In Blender's 3D viewport, press N → open the MCP for Blender tab → click Start MCP Server. That's it — ask Claude to build something.
Note: Only run one instance of the MCP server (either Cursor or Claude Desktop), not both.
Table of Contents
- Quickstart
- Features
- Components
- Installation- [Prerequisites](#prerequisites) - [Make your client find uvx](#make-your-client-find-uvx) - [Pin the Python version](#pin-the-python-version) - [Install without uv](#install-without-uv) - [Run with Docker](#run-with-docker) - [Environment Variables](#environment-variables)
- MCP Client Setup- [Claude for Desktop](#claude-for-desktop) - [Codex](#codex) - [Cursor](#cursor) - [Visual Studio Code](#visual-studio-code) - [OpenCode](#opencode) - [Antigravity](#antigravity)
- Installing the Blender Addon
- Upgrading (existing users)
- Usage- [Starting the Connection](#starting-the-connection) - [Using with Claude](#using-with-claude) - [Capabilities](#capabilities) - [Example Commands](#example-commands)
- Persistent API Credentials
- Troubleshooting
- Technical Details
- Limitations & Security Considerations
- Telemetry Control
- Feedback
- Contributing
- Disclaimer
- Star History
Features
| Two-way communication | Connect Claude AI to Blender through a socket-based server |
| Object manipulation | Create, modify, and delete 3D objects in Blender |
| Material control | Apply and modify materials and colors |
| Scene inspection | Get detailed information about the current Blender scene |
| Code execution | Run arbitrary Python code in Blender from Claude |
| Asset & model generation | Poly Haven assets, Sketchfab models, Poly Pizza low-poly models, and AI-generated 3D models via Hyper3D Rodin and Hunyuan3D |
Components
The system consists of two main components:
- 1Blender Addon (
addon.py) — a Blender addon that creates a socket server within Blender to receive and execute commands - 2MCP Server (
src/blender_mcp/server.py) — a Python server that implements the Model Context Protocol and connects to the Blender addon
Installation
Prerequisites
- Blender 3.0 or newer
- Python 3.10 or newer
- uv package manager
macOS
brew install uvWindows
powershell -c "irm https://astral.sh/uv/install.ps1 | iex"Then add uv to the user path in Windows (you may need to restart Claude Desktop after):
$localBin = "$env:USERPROFILE\.local\bin"
$userPath = [Environment]::GetEnvironmentVariable("Path", "User")
[Environment]::SetEnvironmentVariable("Path", "$userPath;$localBin", "User")
Linux
curl -LsSf https://astral.sh/uv/install.sh | shIt lands in ~/.local/bin — open a new shell so it's on your PATH.
Otherwise, installation instructions are on their website: Install uv
On every OS, use uv's official installer above — not pip install uv, which may not create the uvx command and can hide uv inside an environment your client can't see.
Warning: Do not proceed before installing uv.
Make your client find uvx
MCP clients started from a GUI (Claude Desktop, Cursor, VS Code from the Dock/Start menu) do not inherit your terminal's PATH, so a bare "command": "uvx" can fail with spawn uvx ENOENT even though uvx works in your terminal. If that happens:
- Find uvx's full path —
which uvx(macOS/Linux) orwhere uvx(Windows) — and use it as"command", e.g./opt/homebrew/bin/uvxorC:\Users\<you>\.local\bin\uvx.exe. - On Windows you can instead wrap it:
"command": "cmd", "args": ["/c", "uvx", "mcp-for-blender"]. - After any PATH or config change, fully quit and relaunch the client (Windows: quit from the system tray, not just the window; macOS: Cmd+Q).
Pin the Python version
Avoid conda / pyenv / version conflicts.
uv chooses which Python runs the server. On machines with conda (auto-activated base), pyenv, or asdf — or with a newer CPython release that some dependencies do not have wheels for yet — uv can grab an interpreter that makes installation fail. Pin Python 3.11 and prefer uv-managed interpreters to avoid using whatever is on your PATH:
{
    "mcpServers": {
        "blender": {
            "command": "uvx",
            "args": ["--python", "3.11", "mcp-for-blender"],
            "env": { "UV_PYTHON_PREFERENCE": "only-managed" }
        }
    }
}
--python 3.11 still satisfies this package's requires-python >=3.10, and UV_PYTHON_PREFERENCE=only-managed keeps uv from selecting conda, pyenv, asdf, or system Python first. (The repo's .python-version is only a hint for contributors and does not affect uvx.)
If a previous failed attempt keeps replaying after a fix, clear the cache:
uv cache clean mcp-for-blender blender-mcp && uvx --refresh mcp-for-blenderInstall without uv
On locked-down machines you can skip uvx entirely with pipx, then point your client at the installed command:
pipx install mcp-for-blender
pipx ensurepath          # then restart your shell / client
Use the resulting absolute path as "command" (find it with which mcp-for-blender / where mcp-for-blender) and omit args.
Run with Docker
You can run the MCP server in a container instead of installing it. Blender itself still runs on your machine — the container only hosts the MCP server, which connects out to the Blender addon.
Build the image from the repo root:
docker build -t mcp-for-blender .Then point your MCP client at it (the -i flag is required — the server talks to the client over stdin/stdout):
{
    "mcpServers": {
        "blender": {
            "command": "docker",
            "args": ["run", "-i", "--rm", "mcp-for-blender"]
        }
    }
}
The image defaults to BLENDER_HOST=host.docker.internal, which reaches the host's Blender out of the box with Docker Desktop on macOS and Windows.
On Linux, host.docker.internal doesn't exist and the addon only listens on localhost, so use host networking instead:
{
    "mcpServers": {
        "blender": {
            "command": "docker",
            "args": ["run", "-i", "--rm", "--network=host", "-e", "BLENDER_HOST=localhost", "mcp-for-blender"]
        }
    }
}
To enable safe mode in the container, add "-e", "BLENDER_MCP_SAFE_MODE=1" to args.
Environment Variables
The following environment variables can be used to configure the Blender connection:
| Variable | Default | Description |
|---|---|---|
BLENDER_HOST | localhost | Host address for Blender socket server |
BLENDER_PORT | 9876 | Port number for Blender socket server |
BLENDER_MCP_SAFE_MODE | off | Set to 1 to validate scripts before they run in Blender (see below) |
Example:
export BLENDER_HOST='host.docker.internal'
export BLENDER_PORT=9876
You can also pass the connection as CLI flags, which take precedence over the environment variables. This is handy for running several Blender instances side by side, since each MCP client entry can point at a different port with plain arguments instead of env vars:
uvx mcp-for-blender --port 9877In an MCP client config that means a second entry differing only in args:
{
  "mcpServers": {
    "blender": { "command": "uvx", "args": ["mcp-for-blender"] },
    "blender-b": { "command": "uvx", "args": ["mcp-for-blender", "--port", "9877"] }
  }
}
Each instance needs its own port set in the Blender addon panel to match.
Note: the addon's socket server has no authentication or encryption, so
anyone who can reach that port can run Python inside Blender. Keep it on
localhost unless you are on a trusted network, and prefer an SSH tunnel over
pointing --host/BLENDER_HOST at a remote machine directly.
Safe mode
By default, the AI can run any Python code in Blender. Set BLENDER_MCP_SAFE_MODE=1 to check every script before it runs and block risky code — things like reading or writing files directly, running other programs, accessing the network, or installing code that keeps running after the script ends. Normal Blender work (modeling, materials, rendering, saving, import/export) still works. Blocked scripts are sent back to the AI with the reason, so it can try again with a corrected version.
MCP Client Setup
Claude for Desktop
Watch the setup instruction video (assuming you have already installed uv)
Go to Claude → Settings → Developer → Edit Config → claude_desktop_config.json and include the following:
{
    "mcpServers": {
        "blender": {
            "command": "uvx",
            "args": [
                "mcp-for-blender"
            ]
        }
    }
}
Use the Claude Code CLI to add the MCP for Blender server:
claude mcp add blender uvx mcp-for-blenderCodex
The Codex CLI, desktop app, and IDE extension all share the same config file (~/.codex/config.toml), so setting the server up once covers all three.
Register the server with the Codex CLI:
codex mcp add blender -- uvx mcp-for-blenderOr add it by hand to ~/.codex/config.toml (or $CODEX_HOME/config.toml):
[mcp_servers.blender]
command = "uvx"
args = ["mcp-for-blender"]
Or in the Codex desktop app: Settings → MCP servers → Add server → name it blender, pick STDIO, enter uvx mcp-for-blender as the command, then Save and restart. If the app can't find uvx, use its full path instead — see Make your client find uvx.
Check it registered with codex mcp list — the blender server should show as enabled. The tools become available the next time you start Codex.
To set environment variables (e.g. a non-default Blender host/port), pass --env KEY=VALUE flags to codex mcp add, or add them in the config file:
[mcp_servers.blender]
command = "uvx"
args = ["mcp-for-blender"]
env = { BLENDER_HOST = "localhost", BLENDER_PORT = "9876" }
Cursor
macOS — go to Settings → MCP and paste the following:
- To use as a global server, use the "add new global MCP server" button and paste
- To use as a project-specific server, create
.cursor/mcp.jsonin the root of the project and paste
{
    "mcpServers": {
        "blender": {
            "command": "uvx",
            "args": [
                "mcp-for-blender"
            ]
        }
    }
}
Windows — go to Settings → MCP → Add Server, add a new server with the following settings:
{
    "mcpServers": {
        "blender": {
            "command": "cmd",
            "args": [
                "/c",
                "uvx",
                "mcp-for-blender"
            ]
        }
    }
}Note: Only run one instance of the MCP server (either on Cursor or Claude Desktop), not both.
Visual Studio Code
Prerequisites: Make sure you have Visual Studio Code installed before proceeding.
OpenCode
{
  "mcp": {
    "blender-mcp": {
      "type": "local",
      "command": ["uvx", "mcp-for-blender"],
      "enabled": true,
      "environment": {
        "BLENDER_HOST": "localhost",
        "BLENDER_PORT": "9876"
      }
    }
  }
}
Antigravity
{
  "mcpServers": {
    "blender-mcp": {
      "command": "uvx",
      "args": ["mcp-for-blender"],
      "env": {
        "BLENDER_HOST": "localhost",
        "BLENDER_PORT": "9876"
      }
    }
  }
}
Installing the Blender Addon
1. Recommended — from a terminal, run:
uvx mcp-for-blender install-addonThis copies the addon into your Blender addons folder as blender_mcp.py. It prints where it wrote to, and keeps a .bak of any file it replaces.
Optional: uvx mcp-for-blender addon-paths lists detected Blender addons folders. Override the destination with BLENDERMCP_ADDONS_DIR=/path/to/scripts/addons.
2. Open Blender
3. Go to Edit → Preferences → Add-ons
4. Enable Interface: MCP for Blender (search "MCP for Blender"). If it doesn't appear yet, click Install… and select the copied blender_mcp.py / addon.py, or restart Blender.
5. Manual alternative — if the command above can't find your Blender install, or you prefer doing it by hand: download addon.py from this repo → in Blender, Edit → Preferences → Add-ons → Install… → select the downloaded addon.py → enable it.
Then open the MCP for Blender tab in Blender's sidebar (press N in the 3D viewport) and click Start MCP Server. See Starting the Connection below.
Upgrading (existing users)
For newcomers, go straight to Quickstart. For existing users, see below.
1. Update the addon file by running:
uvx mcp-for-blender install-addon
uvx mcp-for-blender addon-paths   # optional: list detected Blender addons folders
2. In Blender: Preferences → Add-ons → disable and re-enable Interface: MCP for Blender (or restart Blender), then click Start MCP Server again.
3. Delete the MCP server from Claude and add it back again if the server package itself needs a refresh.
Note: the MCP server never modifies your Blender addon files on its own. When it starts, it checks whether the installed addon is behind the bundled copy and logs how to update; install-addon is what actually writes, and it keeps a .bak of the file it replaces. Trajectory capture still works on older loaded addons via an execute_code fallback.
Usage
Starting the Connection
- 1In Blender, go to the 3D View sidebar (press N if not visible)
- 2Find the MCP for Blender tab
- 3Turn on the checkboxes you'd like to use (see more under Capabilities below)
- 4Click Connect to Claude
- 5Make sure the MCP server is running in your terminal
Using with Claude
Once the config file has been set on Claude, and the addon is running on Blender, you will see a hammer icon with tools for MCP for Blender.
Capabilities
- Get scene and object information
- Create, delete and modify shapes
- Apply or create materials for objects
- Execute any Python code in Blender
- Export the scene, the selection or named objects to GLB/FBX for other applications (
export_scene) - Look up node schemas and the bpy API reference instead of guessing socket order or enum names
- Download the right models, assets and HDRIs through Poly Haven
- Search and download models from Sketchfab
- Search and download low-poly models from Poly Pizza
- AI generated 3D models through Hyper3D Rodin and Hunyuan3D
Hunyuan3D on Tencent Cloud (Official API mode)
Which Tencent Cloud service the addon must call depends on where your account lives:
| Account | Service the addon calls | Region | Sidebar toggle |
|---|---|---|---|
| Mainland (cloud.tencent.com) | AI3D 3.0 (ai3d, version 2025-05-13) | ap-guangzhou | leave International (Pro) account off (default) |
| International (tencentcloud.com), Hunyuan-to-3D (Professional) | hunyuan, version 2023-09-01, PBR enabled | ap-singapore | tick International (Pro) account |
International credentials sent to the mainland endpoint fail with AuthFailure.SignatureFailure or
ResourceUnavailable, so tick the toggle when your SecretId/SecretKey come from tencentcloud.com.
The toggle sits under Tencent Hunyuan 3D → Official API in the sidebar.
Poly Pizza
Poly Pizza hosts roughly 10,600 free low-poly models, including the
rescued Google Poly archive. It is the best source for stylised game assets: every model is
a single self-contained .glb, and the geometry is far lighter than Sketchfab's.
- 1Get a free API key at poly.pizza/settings/api
- 2In the 3D View sidebar, tick Use assets from Poly Pizza
- 3Paste the key into the API Key field that appears (or store it permanently under Edit → Preferences → Add-ons → MCP for Blender)
Worked example:
"Search Poly Pizza for a low-poly chair under a CC0 licence and import one at 1 metre tall"
Claude calls search_polypizza_models(query="chair", licence="CC0"), which returns each
match with its licence and triangle count, then
download_polypizza_model(model_id="...", normalize_size=True, target_size=1.0).
You can also filter by category ("Animals", "Furniture & Decor", "Transport",
"Nature", "Buildings", "People & Characters", "Food & Drink", "Weapons",
"Clutter", "Objects", "Scenes & Levels", "Other") or ask for animated models only.
Attribution: about 69% of the Poly Pizza catalogue is CC-BY, which requires you to
credit the creator wherever the model appears. On import, the ready-formatted credit line
is written onto each imported root object as the custom property polypizza_attribution
(alongside polypizza_id and polypizza_licence), so it is saved into your .blend and
survives the session. Filter with licence="CC0" if you would rather use models that need
no credit.
Example Commands
Here are some examples of what you can ask Claude to do:
| Prompt | Demo |
|---|---|
| "Create a low poly scene in a dungeon, with a dragon guarding a pot of gold" | Watch |
| "Create a beach vibe using HDRIs, textures, and models like rocks and vegetation from Poly Haven" | Watch |
| Give a reference image, and create a Blender scene out of it | Watch |
| "Get information about the current scene, and make a threejs sketch from it" | Watch |
| "Generate a 3D model of a garden gnome through Hyper3D" | |
| "Fill this room with low-poly furniture from Poly Pizza" | |
| "Make this car red and metallic" | |
| "Create a sphere and place it above the cube" | |
| "Make the lighting like a studio" | |
| "Point the camera at the scene, and make it isometric" |
Persistent API Credentials
MCP for Blender supports persistent credentials via Blender Add-on Preferences:
Edit → Preferences → Add-ons → MCP for Blender
You can store these values there so they survive Blender restarts:
- Sketchfab API Key
- Poly Pizza API Key
- Hyper3D API Key
- Hunyuan3D SecretId / SecretKey
- Hunyuan3D API URL
For headless setups or CI, credentials can also be injected by environment variables:
| Variable |
|---|
BLENDERMCP_SKETCHFAB_API_KEY |
BLENDERMCP_POLYPIZZA_API_KEY |
BLENDERMCP_HYPER3D_API_KEY |
BLENDERMCP_HUNYUAN3D_SECRET_ID |
BLENDERMCP_HUNYUAN3D_SECRET_KEY |
BLENDERMCP_HUNYUAN3D_API_URL |
Troubleshooting
| Problem | Fix |
|---|---|
| Connection issues | Make sure the Blender addon server is running, and the MCP server is configured on Claude. Do not run the uvx command in the terminal. Sometimes the first command won't go through, but after that it starts working. |
| Timeout errors | Try simplifying your requests or breaking them into smaller steps. |
| Poly Haven integration | Claude is sometimes erratic with its behaviour. |
| Poly Pizza download fails with a Cloudflare challenge | static.poly.pizza is behind bot protection and blocks datacenter, VPN and cloud IPs. Your API key is fine - the CDN never sees it. Retry from a normal connection, or download the .glb by hand and use File → Import → glTF 2.0. |
| Have you tried turning it off and on again? | If you're still having connection errors, try restarting both Claude and the Blender server. |
Technical Details
Communication Protocol
The system uses a simple JSON-based protocol over TCP sockets:
- Commands are sent as JSON objects with a
typeand optionalparams - Responses are JSON objects with a
statusandresultormessage
Limitations & Security Considerations
Warning: The execute_blender_code tool allows running arbitrary Python code in Blender, which can be powerful but potentially dangerous. Use with caution in production environments. ALWAYS save your work before using it.
- Poly Haven requires downloading models, textures, and HDRI images. If you do not want to use it, please turn it off in the checkbox in Blender.
- Complex operations might need to be broken down into smaller steps.
Telemetry Control
MCP for Blender collects anonymous usage data to help improve the tool. Telemetry consent is on by default, and you can turn it off in two ways:
1. In Blender — go to Edit → Preferences → Add-ons → MCP for Blender and uncheck the telemetry consent checkbox.
- With consent (checked, the default): view the TnC for more details on data collected.
2. Environment Variable — completely disable all telemetry by running:
DISABLE_TELEMETRY=true uvx mcp-for-blenderOr add it to your MCP config:
{
    "mcpServers": {
        "blender": {
            "command": "uvx",
            "args": ["mcp-for-blender"],
            "env": {
                "DISABLE_TELEMETRY": "true"
            }
        }
    }
}
Telemetry data is not linked to your name or account. It may be used to improve MCP for Blender, for research, and to train AI models.
Full detail on what is collected, and the license you grant by leaving telemetry on, is in TERMS_AND_CONDITIONS.md.
Feedback
We are actively looking for feedback on MCP for Blender. If you have thoughts, share them here.
If you have more detailed feedback, you can schedule a call with us here — we will credit you in the project.
Join the Community
Give feedback, get inspired, and build on top of the MCP: Discord
Contributing
Contributions are welcome! Please feel free to submit a Pull Request.
Disclaimer
This is a third-party integration and not made by Blender. Made by Siddharth.
Star History
If MCP for Blender is useful to you, consider starring the repo